Showing posts with label craft. Show all posts

DIY Plant Markers Tutorial!

03 June 2013

I have been on the hunt for the perfect adorable plant markers that I could customize, but after scouring Pinterest for weeks, I came up short.  I decided to experiment a little with the left over oilcloth from the outdoor bunting I made last week and  came up with these darling little flags!  I absolutely love the pop of color they add to my mostly green veggie beds and they match perfectly with my colorful containers on the deck!  They are also pretty easy to put together and can be customized to your hearts content!


Oilcloth is the ideal medium for this because it is already waterproof, but you could also experiment with other materials like sandwiching pretty paper between the layers of vinyl and adding extra coats of outdoor modge podge to get a good seal.  Another option would just be to paint directly on the oilcloth with a nice heavy duty acrylic paint, but I can't paint to save my life, hence the printer is my BFF.

Here's what you need to get started :
1/8 yard thick clear vinyl*
patterned paper or oil cloth
a printer or letter stamps
outdoor mod podge
E6000 (or another strong waterproof glue)
6" skewers (or any other kind of dowel or even popsicle sticks)
binder clips
scissors
foam brush

*This is available at your local craft store - usually in large rolls. You can also buy it online. I used a 30 gauge because it was the thickest one available at my store.
1. Start by creating the text for your markers.  I printed a list of the things I was growing on basic white printer paper, but you could handwrite or use cute letter stamps.  Cut eat one into the shape you'd like.  I went with these cute little banner shapes by making a rectangle and then just cutting a little triangle off each end.  Each strip is about 1/2" tall.

2. Using your mod podge, glue down the paper to the oil cloth.  Make sure you have enough room (at least 1 1/2") on the left to wrap around the stick and then an extra 1/2"-1" on the right to cut you triangle for the flag. Also be sure to space them at least 1/2" or more so that you can cut the strips.  Add a layer on top to get a good seal.  Let this dry.

3. Cut your strips out of the oil cloth.  I left about 1/4" on the top and bottom, but you can leave as much room as you like.  You can also do this step with a paper cutter or a straight edge with a rotary cutter if you want to be precise, but I just did it free hand with the scissors and shaped as I went.
Overlay your clear vinyl and cut it into a strip that matches shape of the oil cloth.  Coat the vinyl in mod podge and lay it on top of your oil cloth.  Let it dry for about 30 minutes to an hour.  Don't worry about the white streaks, it will dry clear!  Once the mod podge is dry (it will no longer slip around on top of the oil cloth).  You can cut your triangle off the end.

4. Seal the edges with a coat of mod podge.  This will ensure that water can't get in between your oil cloth and vinyl to protect the paper inside.  Just use a foam brush and rub it along the edge. Since the mod podge dries clear, don't worry if it gets on the front vinyl, you can just coat the whole thing if you want.  Let dry.  Add one more coat around the edges.

5. The last step is attaching your sticks.  To do this, just turn it over add your E6000 to the flat edge.  Use the non-pointy end of your skewer to spread the glue and be sure the stick is nicely coated.  Wrap around the stick.  Once it's tightly wrapped and in place, use a binder clip to hold it in place.  Let dry.

Add to your plants and enjoy!


You can also experiment with different shapes!  This heart was made with the same process, I just used a large heart punch and added one more layer of the clear vinyl to the back side to make sure the stick was held tightly in place.  I love this shape because I can add notes like planting dates!


Happy gardening!

Ruffle Curtains Tutorial!

28 January 2013

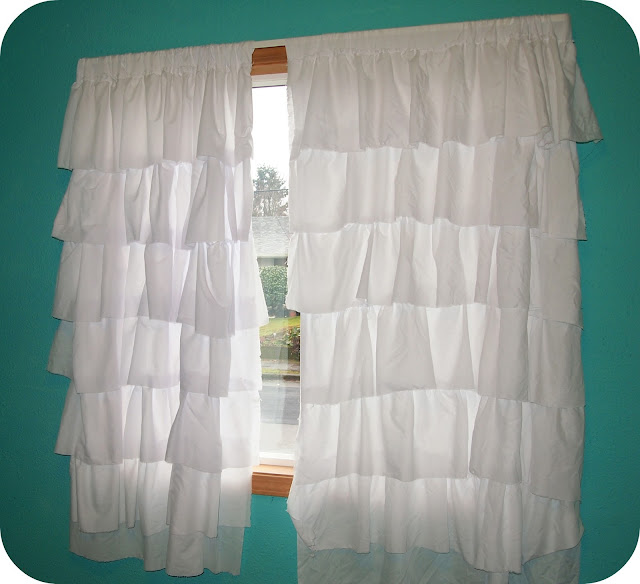
I have been seeing these amazing ruffled curtains around the internet and I knew I needed to have them in my craft room.  This method may seem a bit complicated, but it is easier than you think!  The ruffle is very forgiving since there is a lot of free-flowing textures, so if your lines are a little off or your ruffles are uneven, it will still look just how it should. 


You will need:
7 yards of fabric - I used a lightweight cotton, but you could use anything that you like
white thread
a sewing machine
a ruler & rotary cutter (you could use scissors, but a quilters set will really make this MUCH easier for you!)

Make yourself a basic curtain.  Just measure your fabric to the size of your window + about 4-5" inches and cut. Use that 4-5" to fold over and make a seem - this is where you will put the pole though.

Next, you need to make your ruffles!  How many ruffles you would like to have is up to you -this part just requires a smidge of math on your part, here's how:

Total length of your curtain ÷ # of ruffles you'd like + 2" (for the overhang of each layer, you could do a little more if you'd like)  = height of each fabric strip.  
The width will be about twice as wide as your curtain.

I liked the shaggy look, so I did about 7 layers of 10", but  you can customize it to your ascetic.

Now, let's start making the ruffles! 


Using a loose long stitch, stitch along the length of top of the strip (about 1/2" down from the edge) - do not backstitch. Now, grab the end of the string at the end and give it a little pull (careful not to pull too hard and break the thread). This will start to give you a ruffle, just keep pulling and adjusting the fabric as you go (don't worry about making it even at this point, you can finess once you start to place it).  I think it's ideal to just do all of your ruffles at the same time, so repeat the process through all your strips.


Once you have the ruffle ready, lay it down on your curtain and adjust it until the width is just right.  Start your first ruffle right about where your seem for the curtain rod is.  Pin the ruffle in place along the line and stitch it in place.  Follow that same process of pinning and stitching for all the layers.  Each of the layers should be set about 1"-2" above where the one above it ends.  You could adjust this overhang to be more or less depending on what you like.

I really like the idea of the curtain looking a bit shabby chic, so I decided that I wanted to leave the bottom raw rather than hemming it.  You could hem the bottom if you'd like a cleaner finish, just add about an inch to the height of each strip and fold over & sew.

You can also use this method to create other projects as well!  I did the exact same process for the dessert table at our wedding - I just started with a premade fitted tablecloth and attached ruffles across the front panel.  I absolutely love how special it turned out!


Now go on, ruffle everything!

fun with felt!

03 April 2009

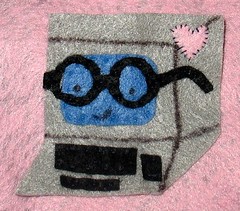
felt is one of my favorite materials to play with. it doesn't fray, it's super cheap, readily accessible and it is thick and a little stiff so it is easy to cut into shapes and hold it's own. one of my nerd-tastic friends was having a birthday, so i wanted to give her something handmade and accommodating to my very small budget. this is what i came up with...

IMG_7689

i added a sew on pinback so it can be displayed anywhere. it's just a little cut out with a little hand sewing and it costs just a few cents to make, but i think it turned out adorable and it was super personal for my computer nerd, dorky glasses loving friend. she loved it.

simple baby things.

24 March 2009

someone wonderful in my life is having a baby in a few weeks and i really wanted to make her a simple little token of appriciation and support. i am not really a baby person. i don't know much about what a new mom needs, but decided on a really simple, but cute handmade bib.

this whole project probably costs about $2 (depending on your fabric of course) or so and takes maybe a half hour, but i think this makes a really sweet gift.

IMG_7533
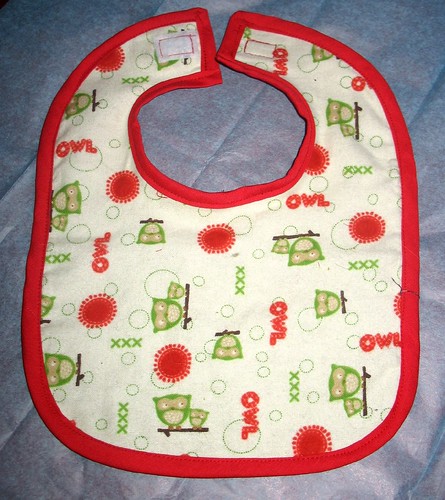
i used a great pattern from jill and just cut out one layer of flannel (i had this really cute owl fabric that i got on sale at joanns that had been mulling around my craft room for months, so i was excited to use it) and one out of a clean recycled terrycloth towel. then you just need to iron and sew the two parts together (no need to make super perfect edges because you will be covering this stitch with bias)...you might not even need that step, but i found having the two peices already sewn made adding the bias tape easier. next, you just find a corodinating bias tape...i used 1/2", but you can use whatever size you think looks best...and sew it around all the edges and inside the neckline. you could add snaps for a fastener at the top, but i just used some simple velcro squares. and voila! easy peasy baby bib that is both cute and easy to throw in the washer!

b
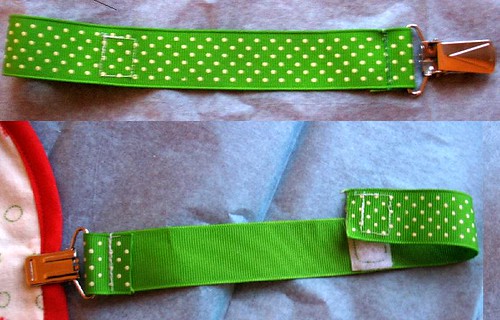
i also made a little pacifier holder for her. it is basically just a some cute ribbon and a bit of velcro stitched at one end to form a loop to hold the pasifier and then a little clip (i got a 2 pack of suspender clips from joanns, but you could also use little name badge clips from an office supply store) sewn on to the other end that clips to the baby's shirt. again, i know very little about babies, but my coworker tells me this is a very valuable little tool to keep pacifers off the floor.
 
Blogging tips