Showing posts with label home decor. Show all posts

An Easy DIY Outdoor Bunting!

24 May 2013

Earlier this week, I shared a bit of my colorful outdoor space.  I am really pleased with the simplicity of it and how much it all feels like summer to me when I'm out there.  As promised, I have a few projects to share!


One little element that I wanted to add was a little something to spruce up the wall.  I decided on a simple darling pennant banner.  It's made with oilcloth, so it's weatherproof & doesn't require a bit of sewing.  If you aren't familiar with oilcloth, it is available in a wide variety of colors and patterns online or in large rolls at your local fabric store.  The banner is super easy to put together and you can make one too!  Here's how..


All you need is:

oil cloth in a variety of colors (at least 1/8 yard strips)
ruler
rotary cutter or scissors
a hole punch
twine that is the length of the space you'd like the banner to go
heavy duty glue (I like E6000, but Gorilla Glue or SuperGlue would be just fine too)


1. Start by making a template for your triangles.  I do this by cutting a piece of paper to be the length of the top of the triangles (in this case, I bought 1/8 yard strips of oil cloth, so I did 4.5", but feel free to make it wider if you'd like).  Fold the paper in half & use your ruler to create an angle that you like.  Cut the paper out, unfold it, and you have your template!

2. Cut a whole bunch of triangles from your template in all of your different colors.  A quilting type rotary cutter makes this step much easier (and it is a great investment for future projects!), but scissors will work just fine.


3. Punch holes in your oil cloth triangles.  You want them to be even and in about the same place on each one.  No worries if you are a couple millimeters off, it's not going to be noticeable when it's hung up.

4. String your triangles together.  Mix up the patterns and colors randomly or create a pretty repeating pattern of your own.  Once they are all strung, you probably want to add a couple of dabs of glue to the back where the string sits.  The glue will just ensure that they lay flat when you hang them up since they are made of a thin flexible material and tend to bow in the middle when hung.

5. Hang your pretty creation up & enjoy!


Be sure to save your leftover oilcloth because I have another darling outdoor craft to share soon! ;)

My Colorful Patio!

21 May 2013

My deck is one of favorite places in my house.  We use it every chance we get in the summer!   From big BBQs to quiet morning coffee in the sunshine...I feel really lucky to have such a cute outdoor oasis.       I thought it might be fun to share it with you all!

Because I love the space so much, it was really important to be to make it feel really joyful with every design and color is my favorite way to do that.   I also have a super tight budget, so I found a lot of really simple and inexpensive ways to add some pops of color.  I chose some vibrant colored panters, a pair of turquoise adirondack chairs for lounging, and a really simple outdoor table with a fun bright tablecloth.

I've been working on some really cute & easy outdoor project tutorials (including that adorable pennant banner below!) - so stay tuned for those later this week!

For some reason, this old bike was tucked away up on the roof of our storage shed when we moved in, so we decided to embrace it and stand it up for a fun display.
A rainbow of container gardening!  Carrots, zucchini, peppers, cucumber, tomato, and peas.  Amazing bonus: our  metal lattice works as a perfect support trellis for peas and cucumbers to vine up!  

New pennant banner - tutorial tomorrow!
Vertical gardening using some great planters from Target & awesome Bygel containers from Ikea.
A bright lemon yellow tablecloth is the perfect place for some cold lemonade
Pretty turquoise chairs for lounging and hanging out with the pup.

Just beyond the deck, we have some gorgeous rose bushes...they don't call this place Rose City for nothin!

Getting the deck ready makes me really excited for the summertime!  Do you have an outdoor space that you love?  I'd love to hear about it!

Scallop Desk Makeover

24 February 2013


I've been in the market for a new sewing table and I found this adorable little wooden desk at Goodwill for $15.  I was absolutely in love with the cute little scallop pattern on the drawers, but I really wanted to bring it out a little more and also make it match the craft room, so I set out for a makeover!

A few cans of white spray paint later...


The most challenging part was that the tabletop is made of a plastic vaneer, so it didn't take the spray paint very well and it was hard to get it to match up just right with the different material and undertone.  To compensate and glitz it up a bit to bring more gold, so I decided to play with a glitter treatment on the top.  I used a dry brush technique with Martha Stewart glitter paint in Florentine Gold.  I like that it looks a little like vintage formica.


I absolutely love it and I can't wait to get my sewing machine set up!

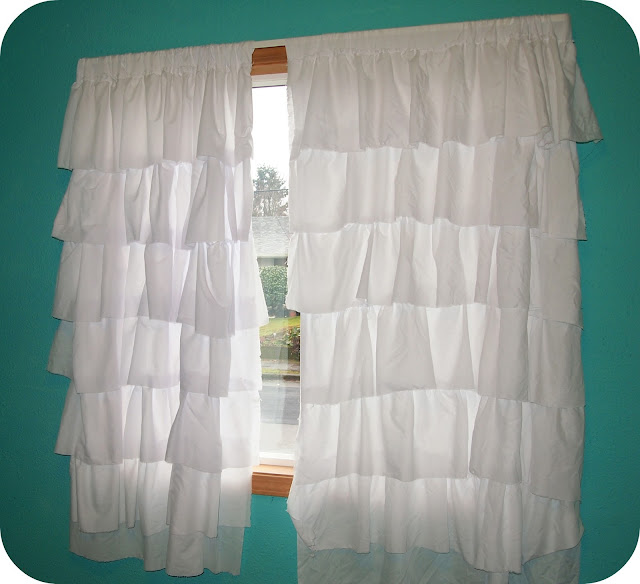
Ruffle Curtains Tutorial!

28 January 2013

I have been seeing these amazing ruffled curtains around the internet and I knew I needed to have them in my craft room.  This method may seem a bit complicated, but it is easier than you think!  The ruffle is very forgiving since there is a lot of free-flowing textures, so if your lines are a little off or your ruffles are uneven, it will still look just how it should. 


You will need:
7 yards of fabric - I used a lightweight cotton, but you could use anything that you like
white thread
a sewing machine
a ruler & rotary cutter (you could use scissors, but a quilters set will really make this MUCH easier for you!)

Make yourself a basic curtain.  Just measure your fabric to the size of your window + about 4-5" inches and cut. Use that 4-5" to fold over and make a seem - this is where you will put the pole though.

Next, you need to make your ruffles!  How many ruffles you would like to have is up to you -this part just requires a smidge of math on your part, here's how:

Total length of your curtain ÷ # of ruffles you'd like + 2" (for the overhang of each layer, you could do a little more if you'd like)  = height of each fabric strip.  
The width will be about twice as wide as your curtain.

I liked the shaggy look, so I did about 7 layers of 10", but  you can customize it to your ascetic.

Now, let's start making the ruffles! 


Using a loose long stitch, stitch along the length of top of the strip (about 1/2" down from the edge) - do not backstitch. Now, grab the end of the string at the end and give it a little pull (careful not to pull too hard and break the thread). This will start to give you a ruffle, just keep pulling and adjusting the fabric as you go (don't worry about making it even at this point, you can finess once you start to place it).  I think it's ideal to just do all of your ruffles at the same time, so repeat the process through all your strips.


Once you have the ruffle ready, lay it down on your curtain and adjust it until the width is just right.  Start your first ruffle right about where your seem for the curtain rod is.  Pin the ruffle in place along the line and stitch it in place.  Follow that same process of pinning and stitching for all the layers.  Each of the layers should be set about 1"-2" above where the one above it ends.  You could adjust this overhang to be more or less depending on what you like.

I really like the idea of the curtain looking a bit shabby chic, so I decided that I wanted to leave the bottom raw rather than hemming it.  You could hem the bottom if you'd like a cleaner finish, just add about an inch to the height of each strip and fold over & sew.

You can also use this method to create other projects as well!  I did the exact same process for the dessert table at our wedding - I just started with a premade fitted tablecloth and attached ruffles across the front panel.  I absolutely love how special it turned out!


Now go on, ruffle everything!
 
Blogging tips