Showing posts with label DIY. Show all posts

Wedding Detail: DIY Painted Wedding Shoes

15 September 2013

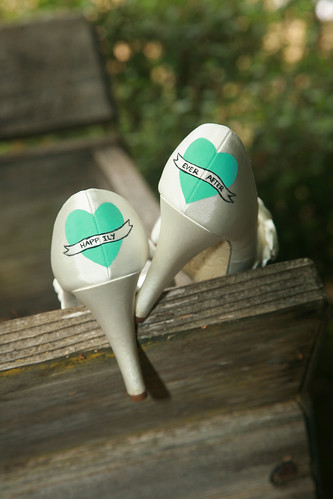
Painted wedding shoes!

One of my very favorite details of the wedding was my shoes.  I really wanted to take my simple white shoes and turn them into something unique and special that would be a little added surprise when I walked down the isle.  I decided to enlist the help of my amazing artist husband to be and made these really simple, but amazing custom wedding shoes!

All you need:
A pair of shoes of your choice : canvas or satin will work best
a pencil
an oil based paint pen
acrylic paint & brush

This is kind of a percarious task, it takes a little bit of gusto to just go ahead and just do it and paint on those beautiful shoes, but you have to just dive right in!  I chose simple and inexpensive shoes because I really felt like rather than splurging on fancy shoes, I wanted my WOW to be in the personalization and it made me less nervous to make a mistake ;)

We started by using pencil to outline the design.  In our case, we kept it simple with the heart and banner that matched our theme and was kind of reminecient of classic tattoo art that I love. The heart was filled in with a simple inexpensive acrylic art paint.  Next, we used the paint pen to outline and write the text out.  We found that the paint pen was the easiest way to get a nice fine controlled line.

That's it!  Its actually quite simple to make some amazing showstopper shoes that reflect your personality!  

Do they last and hold up?  I don't really know.  I can't promise that if you wore them many times or took a dip into a deep puddle that they wouldn't run, but they are perfect for that one special wear.

An Easy DIY Outdoor Bunting!

24 May 2013

Earlier this week, I shared a bit of my colorful outdoor space.  I am really pleased with the simplicity of it and how much it all feels like summer to me when I'm out there.  As promised, I have a few projects to share!


One little element that I wanted to add was a little something to spruce up the wall.  I decided on a simple darling pennant banner.  It's made with oilcloth, so it's weatherproof & doesn't require a bit of sewing.  If you aren't familiar with oilcloth, it is available in a wide variety of colors and patterns online or in large rolls at your local fabric store.  The banner is super easy to put together and you can make one too!  Here's how..


All you need is:

oil cloth in a variety of colors (at least 1/8 yard strips)
ruler
rotary cutter or scissors
a hole punch
twine that is the length of the space you'd like the banner to go
heavy duty glue (I like E6000, but Gorilla Glue or SuperGlue would be just fine too)


1. Start by making a template for your triangles.  I do this by cutting a piece of paper to be the length of the top of the triangles (in this case, I bought 1/8 yard strips of oil cloth, so I did 4.5", but feel free to make it wider if you'd like).  Fold the paper in half & use your ruler to create an angle that you like.  Cut the paper out, unfold it, and you have your template!

2. Cut a whole bunch of triangles from your template in all of your different colors.  A quilting type rotary cutter makes this step much easier (and it is a great investment for future projects!), but scissors will work just fine.


3. Punch holes in your oil cloth triangles.  You want them to be even and in about the same place on each one.  No worries if you are a couple millimeters off, it's not going to be noticeable when it's hung up.

4. String your triangles together.  Mix up the patterns and colors randomly or create a pretty repeating pattern of your own.  Once they are all strung, you probably want to add a couple of dabs of glue to the back where the string sits.  The glue will just ensure that they lay flat when you hang them up since they are made of a thin flexible material and tend to bow in the middle when hung.

5. Hang your pretty creation up & enjoy!


Be sure to save your leftover oilcloth because I have another darling outdoor craft to share soon! ;)
 
Blogging tips