Showing posts with label tutorial. Show all posts

Wedding Detail: DIY Painted Wedding Shoes

15 September 2013

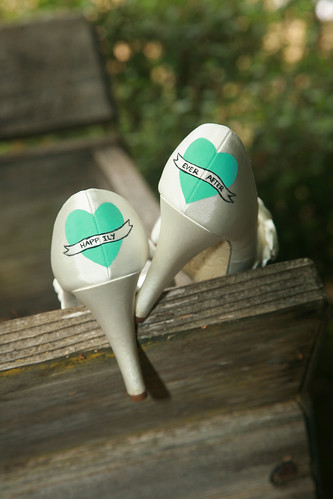
Painted wedding shoes!

One of my very favorite details of the wedding was my shoes.  I really wanted to take my simple white shoes and turn them into something unique and special that would be a little added surprise when I walked down the isle.  I decided to enlist the help of my amazing artist husband to be and made these really simple, but amazing custom wedding shoes!

All you need:
A pair of shoes of your choice : canvas or satin will work best
a pencil
an oil based paint pen
acrylic paint & brush

This is kind of a percarious task, it takes a little bit of gusto to just go ahead and just do it and paint on those beautiful shoes, but you have to just dive right in!  I chose simple and inexpensive shoes because I really felt like rather than splurging on fancy shoes, I wanted my WOW to be in the personalization and it made me less nervous to make a mistake ;)

We started by using pencil to outline the design.  In our case, we kept it simple with the heart and banner that matched our theme and was kind of reminecient of classic tattoo art that I love. The heart was filled in with a simple inexpensive acrylic art paint.  Next, we used the paint pen to outline and write the text out.  We found that the paint pen was the easiest way to get a nice fine controlled line.

That's it!  Its actually quite simple to make some amazing showstopper shoes that reflect your personality!  

Do they last and hold up?  I don't really know.  I can't promise that if you wore them many times or took a dip into a deep puddle that they wouldn't run, but they are perfect for that one special wear.

DIY Plant Markers Tutorial!

03 June 2013

I have been on the hunt for the perfect adorable plant markers that I could customize, but after scouring Pinterest for weeks, I came up short.  I decided to experiment a little with the left over oilcloth from the outdoor bunting I made last week and  came up with these darling little flags!  I absolutely love the pop of color they add to my mostly green veggie beds and they match perfectly with my colorful containers on the deck!  They are also pretty easy to put together and can be customized to your hearts content!


Oilcloth is the ideal medium for this because it is already waterproof, but you could also experiment with other materials like sandwiching pretty paper between the layers of vinyl and adding extra coats of outdoor modge podge to get a good seal.  Another option would just be to paint directly on the oilcloth with a nice heavy duty acrylic paint, but I can't paint to save my life, hence the printer is my BFF.

Here's what you need to get started :
1/8 yard thick clear vinyl*
patterned paper or oil cloth
a printer or letter stamps
outdoor mod podge
E6000 (or another strong waterproof glue)
6" skewers (or any other kind of dowel or even popsicle sticks)
binder clips
scissors
foam brush

*This is available at your local craft store - usually in large rolls. You can also buy it online. I used a 30 gauge because it was the thickest one available at my store.
1. Start by creating the text for your markers.  I printed a list of the things I was growing on basic white printer paper, but you could handwrite or use cute letter stamps.  Cut eat one into the shape you'd like.  I went with these cute little banner shapes by making a rectangle and then just cutting a little triangle off each end.  Each strip is about 1/2" tall.

2. Using your mod podge, glue down the paper to the oil cloth.  Make sure you have enough room (at least 1 1/2") on the left to wrap around the stick and then an extra 1/2"-1" on the right to cut you triangle for the flag. Also be sure to space them at least 1/2" or more so that you can cut the strips.  Add a layer on top to get a good seal.  Let this dry.

3. Cut your strips out of the oil cloth.  I left about 1/4" on the top and bottom, but you can leave as much room as you like.  You can also do this step with a paper cutter or a straight edge with a rotary cutter if you want to be precise, but I just did it free hand with the scissors and shaped as I went.
Overlay your clear vinyl and cut it into a strip that matches shape of the oil cloth.  Coat the vinyl in mod podge and lay it on top of your oil cloth.  Let it dry for about 30 minutes to an hour.  Don't worry about the white streaks, it will dry clear!  Once the mod podge is dry (it will no longer slip around on top of the oil cloth).  You can cut your triangle off the end.

4. Seal the edges with a coat of mod podge.  This will ensure that water can't get in between your oil cloth and vinyl to protect the paper inside.  Just use a foam brush and rub it along the edge. Since the mod podge dries clear, don't worry if it gets on the front vinyl, you can just coat the whole thing if you want.  Let dry.  Add one more coat around the edges.

5. The last step is attaching your sticks.  To do this, just turn it over add your E6000 to the flat edge.  Use the non-pointy end of your skewer to spread the glue and be sure the stick is nicely coated.  Wrap around the stick.  Once it's tightly wrapped and in place, use a binder clip to hold it in place.  Let dry.

Add to your plants and enjoy!


You can also experiment with different shapes!  This heart was made with the same process, I just used a large heart punch and added one more layer of the clear vinyl to the back side to make sure the stick was held tightly in place.  I love this shape because I can add notes like planting dates!


Happy gardening!

An Easy DIY Outdoor Bunting!

24 May 2013

Earlier this week, I shared a bit of my colorful outdoor space.  I am really pleased with the simplicity of it and how much it all feels like summer to me when I'm out there.  As promised, I have a few projects to share!


One little element that I wanted to add was a little something to spruce up the wall.  I decided on a simple darling pennant banner.  It's made with oilcloth, so it's weatherproof & doesn't require a bit of sewing.  If you aren't familiar with oilcloth, it is available in a wide variety of colors and patterns online or in large rolls at your local fabric store.  The banner is super easy to put together and you can make one too!  Here's how..


All you need is:

oil cloth in a variety of colors (at least 1/8 yard strips)
ruler
rotary cutter or scissors
a hole punch
twine that is the length of the space you'd like the banner to go
heavy duty glue (I like E6000, but Gorilla Glue or SuperGlue would be just fine too)


1. Start by making a template for your triangles.  I do this by cutting a piece of paper to be the length of the top of the triangles (in this case, I bought 1/8 yard strips of oil cloth, so I did 4.5", but feel free to make it wider if you'd like).  Fold the paper in half & use your ruler to create an angle that you like.  Cut the paper out, unfold it, and you have your template!

2. Cut a whole bunch of triangles from your template in all of your different colors.  A quilting type rotary cutter makes this step much easier (and it is a great investment for future projects!), but scissors will work just fine.


3. Punch holes in your oil cloth triangles.  You want them to be even and in about the same place on each one.  No worries if you are a couple millimeters off, it's not going to be noticeable when it's hung up.

4. String your triangles together.  Mix up the patterns and colors randomly or create a pretty repeating pattern of your own.  Once they are all strung, you probably want to add a couple of dabs of glue to the back where the string sits.  The glue will just ensure that they lay flat when you hang them up since they are made of a thin flexible material and tend to bow in the middle when hung.

5. Hang your pretty creation up & enjoy!


Be sure to save your leftover oilcloth because I have another darling outdoor craft to share soon! ;)

Ruffle Curtains Tutorial!

28 January 2013

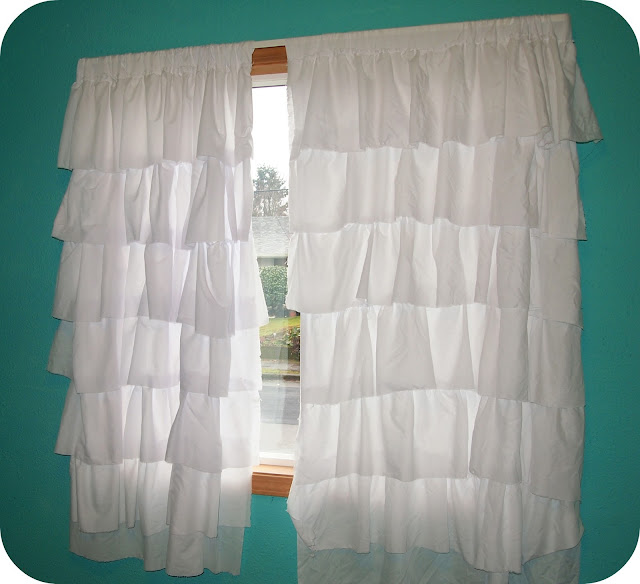
I have been seeing these amazing ruffled curtains around the internet and I knew I needed to have them in my craft room.  This method may seem a bit complicated, but it is easier than you think!  The ruffle is very forgiving since there is a lot of free-flowing textures, so if your lines are a little off or your ruffles are uneven, it will still look just how it should. 


You will need:
7 yards of fabric - I used a lightweight cotton, but you could use anything that you like
white thread
a sewing machine
a ruler & rotary cutter (you could use scissors, but a quilters set will really make this MUCH easier for you!)

Make yourself a basic curtain.  Just measure your fabric to the size of your window + about 4-5" inches and cut. Use that 4-5" to fold over and make a seem - this is where you will put the pole though.

Next, you need to make your ruffles!  How many ruffles you would like to have is up to you -this part just requires a smidge of math on your part, here's how:

Total length of your curtain ÷ # of ruffles you'd like + 2" (for the overhang of each layer, you could do a little more if you'd like)  = height of each fabric strip.  
The width will be about twice as wide as your curtain.

I liked the shaggy look, so I did about 7 layers of 10", but  you can customize it to your ascetic.

Now, let's start making the ruffles! 


Using a loose long stitch, stitch along the length of top of the strip (about 1/2" down from the edge) - do not backstitch. Now, grab the end of the string at the end and give it a little pull (careful not to pull too hard and break the thread). This will start to give you a ruffle, just keep pulling and adjusting the fabric as you go (don't worry about making it even at this point, you can finess once you start to place it).  I think it's ideal to just do all of your ruffles at the same time, so repeat the process through all your strips.


Once you have the ruffle ready, lay it down on your curtain and adjust it until the width is just right.  Start your first ruffle right about where your seem for the curtain rod is.  Pin the ruffle in place along the line and stitch it in place.  Follow that same process of pinning and stitching for all the layers.  Each of the layers should be set about 1"-2" above where the one above it ends.  You could adjust this overhang to be more or less depending on what you like.

I really like the idea of the curtain looking a bit shabby chic, so I decided that I wanted to leave the bottom raw rather than hemming it.  You could hem the bottom if you'd like a cleaner finish, just add about an inch to the height of each strip and fold over & sew.

You can also use this method to create other projects as well!  I did the exact same process for the dessert table at our wedding - I just started with a premade fitted tablecloth and attached ruffles across the front panel.  I absolutely love how special it turned out!


Now go on, ruffle everything!
 
Blogging tips