Celebrating the Chinese New Year with Pork Goyza!

31 January 2014

Today is the Chinese New Year! Welcome the Year of the Horse!

To celebrate, I made one of my new favorite recipes - pork pot stickers (goyza)! Jiaozi dumplings are a traditional Chinese New Year dish in northern China and are often shaped into an ingot coin shape because eating them is said to bring prosperity in the new year.  Mine might not be as pretty as traditional dumplings, but they are just as delicious and I am excited to make them again and get better at my folding skills!


This may seem like a daunting recipe because there are a lot steps, but they are all super easy and the results are fantastic. The dumplings are wonderfully filling these would make a real WOW for an party appetizer, or you could just make them for dinner as a fun way to switch things up for your family. My husband and I made these with a stirfry, but they were so good that we ended up just filling up on dumplings and just saved the stirfry for a massive left-overs the next night!

You can use premade wontons, or just make this 3 ingredient dough yourself. It is super easy to put together and really rewarding and I'm sure you already have all these ingredients on hand! The dough is nice and tender and a little thicker than the usual wonton wrappers. My husband & I both just loved them!


Chinese Pork Dumplings
makes about 30 dumplings

To make the dough:
2 cups all-purpose flour, sifted
3/4 cup boiling water
1/4 teaspoon salt


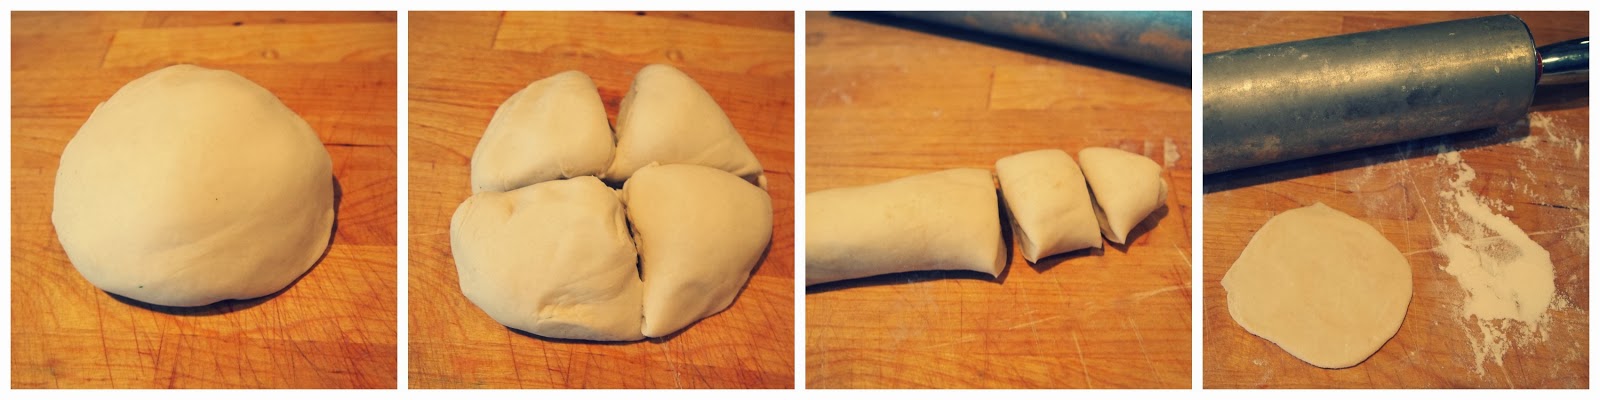
Using a dough hook on your stand mixer, combine ingredients and mix until a smooth ball forms. Mix on medium-high speed to kneed the dough for about 5 minutes. If you don't have a stand mixer, you can mix the ingredients using a chopstick and let them sit for a few moments until cool enough to kneed by hand for 5 minutes. Cover dough and let rest for one hour.

Divide the dough into 4 sections and the roll each section into about 1" logs. Cut into 3" pieces. You should end up with about 20-30 peices. Roll into balls, flatten, and roll out to about 1/8" with a rolling pin. Be sure to flour your surface to avoid sticking. As you work, cover your pieces with a wet paper towel to keep them from drying out.

Filling:
1 cup ground pork
1 tablespoon soy sauce
1 teaspoon salt
1 tablespoon rice wine vinegar
1/4 teaspoon pepper
3 tablespoons sesame oil
1/4 cup green onion, finely minced
1 1/2 cups finely diced Napa cabbage
1 clove garlic, peeled and finely minced
1 teaspoon minced ginger (or powdered ginger is fine)


Mix all ingredients by hand until fully combined.

Assemble the dumplings by adding about a teaspoon of filling to the center of each. Wet the edge of one side, fold over, and seal by pinching the tops.

You have several options when it comes to cooking, you could steam, fry, or boil them. I really love the traditional goyza option of frying & steaming...it gives a really great crunchy bottom and a soft pillowy top. To do that, put about 2 tablespoons of vegetable oil in a large skillet, heat to medium-high heat until the oil is hot and glistens. Add dumplings and cook for about 3-5 minutes until the bottoms are browned. Add about 1/3 cup of water to the pan and quickly cover with a lid. Turn down to medium and allow the dumplings to steam for about 20 minutes.


Dipping sauce:
1/2 cup soy sauce
1/4 cup sweet soy
1 tablespoon rice vinegar
1 tablespoon finely minced ginger

Whisk all ingredients together and serve along with your dumplings.

Enjoy and happy new year!

Sponsor New Wave Domesticity in February! Get 1 Month Free!

30 January 2014

I am so excited to be back to blogging this month and I am thrilled to be able to open up sponsorship opportunities! Blogging is all about community and support - I love being able to promote and share lots of amazing project, so I would love to feature your blog, etsy shop, business, or project on New Wave Domesticity! Next month I will also be opening up a new sponsor feature so that I introduce you to all my readers!

Your sponsorship dollars go directly into helping this blog grow and I appreciate your support & hope that we can grow together! I am excited to learn more about your blog and projects. If you'd like to swap ads, I would love that too, just get in touch!

I also love hosting giveaways and featuring guest posts when they are a good fit for my audience, so please get in touch if you are interested.  In addition, I am happy to occasionally do reviews for products or businesses. Want stats? Click here!

I would be delighted to hear from you to get involved in other ways.  I am always opened to teaming up with other bloggers for exciting new projects, guest posting, and opportunities - please get in touch!  Email sarahswingset@gmail.com.
All ads are subject to approval.

We Are Mint to Be : DIY Buttermints for Valentine's Day + Free Printable

29 January 2014

Free printable : We are mint to be!  + easy DIY buttermint recipe

I have bit of a soft spot for buttermints.  You know the ones...those baby pink, yellow, and green candies that used to be in your grandma's candy dish or in little tulle satchels as wedding favors.  The ones that feel like little soft mint pillows melting away into your mouth.  Sure, they taste a little like chalk, but they really bring me back to a sweet, child-like place.

Buttermints are really simple to make and they are perfect for Valentine's Day because you can cut them into any shape or color you want.  Also, like many things, the homemade version will change the way you look at this candy - it's not chalky at all, but instead the homemade buttermints are softer and much more rich and decedent.  I also experimented with another version - chocolate buttermints. They feel almost like minty truffles and are so smooth and luxurious, so if you are a fan of the chocolate + mint combination, these are perfection!  And they make the perfect gift for Valentine's Day!

Free printable : We are mint to be!  + DIY buttermint recipe

Homemade Buttermints
makes about 15 dozen mints

1/2 cup unsalted butter, at room temperature
4 cups (1 lb) powdered sugar, plus more for dusting
1 tablespoon cream or milk
1 teaspoon vanilla extract
1/4-1 teaspoon peppermint extract
food coloring 

Beat butter in a stand mixer using the paddles attachment until smooth.  Add powdered sugar, milk, vanilla, and 1/4 teaspoon peppermint extract and mix on medium speed until candy is smooth.  Taste the candy and add more peppermint as needed - the extract is usually quite strong, so start with a small amount and add more in 1/4 teaspoon increments until it meets your taste.  Remember, you can always add more mint, but you can't go backwards - a little goes a long way.

Once you have the right flavor, you can add your color and mix until fully combined.   The dough will be very thick, but pliable.

Recipe for easy homemade buttermints! Yum!

To make the mints, the traditional way is to roll the dough into long cylinders and cut 1/4"-1/2" squares off.  You can also just roll the dough to about 1/2" and cut out like you would a cookie.  Use powdered sugar to cover your workspace and rolling pin to avoid sticking.  I used a small heart cutter that I found at the local craft store with the clay supplies.  There's no wrong way to cut and design your mints.  Once they are cut, just set them on on a cookie sheet to dry for about 24 hours.   They will harden on the outside, but the inside will stay nice and smooth.  Store in an airtight container in the fridge for up to a month.

Recipe for easy homemade chocolate buttermints!

To make mint chocolates : Follow the above recipe and simply add 2 tablespoons cocoa powder + 1 teaspoon milk or cream and omit the coloring!


I wanted to give these as little Valentines gifts, so I packaged them up in small cellophane bags and made up this little label for them!

Free printable : We are mint to be!  + DIY buttermint recipe


Print the labels onto cardstock and cut into 1/4 sheets.  Fold and staple over 3"x5" cellophane bags filled with candy.  Give and spread joy!

Easy Valentine Gift : Sew Glad We're Friends!

27 January 2014

Valentine's Day is just around the corner and I am excited to put together some sweet little cards and gifts for the people I love most over the next few weeks!  The first is this darling little simple sewing kit valentine!

I just love these little inexpensive sewing kits.  They are perfect for keeping at your desk or in your purse for an emergency, just a ideal little utilitarian item.  I do so love the ability to combine a utilitarian, useful trinket gift with an adorable valentine pun and it was super simple to put together!


This little guy will be making a visit to the other side of the country to show some valentine's love to a friend that I have been missing dearly!

Thriving in 2014 : Recovering from Neurosurgery and Getting Creative.

24 January 2014


It's been a really difficult few months, but I really want to focus my intention on not just recovering, but really thriving and growing in 2014.  Even though I am a bit behind the ball, I am really excited to start participating in the new Creative Collective that the lovely Melyssa is running.   The first project is to make a project of a word that represents your intentions for 2014.  Well, this year has started off with a bang for me and it has made me do a lot of thinking about my aspirations for a better year to come.

Last week, I had a neurosurgery to repair an encephalocele (basically a brain hernia into my ear canal).  I was hospitalized for a few days and it has been a really difficult process towards healing, but I feel optimistic.  I want to focus my year on that optimism and my intentions to heal and grow in new ways this year.

There were a lot of risks and fears before surgery, but I am feeling really fortunate that not only did the surgery go well, but I also have had an amazing out pour of support from the people in my life before and afterwards.  Sometimes the hardest things we experience are the things that teach us the most about gratitude and how lucky we are.  Had I not had this dark, stressful time, I may not have taken a moment to really step back and see that I am incredibly lucky with the friendships and relationships in my life and those who really step up and are deeply impacted by what I'm experiencing.  My husband has also been unbelievably supportive and patient with me through every step of this process.  The end result of this surgery will be that I will find new ways to thrive and learn to be happy and healthy.

So, where do I go from here?  I want to learn to focus on growing into the strong person that I know I am.  I don't want to just live my life, I want to thrive.  I want to grow and nurture those important relationships in my life.  I also want to nurture my self and focus on self-care and know that it is not selfishness to be strong and take stock of my personal needs.  This year, I intent to focus on that growth - on traveling, experiencing, loving, laying roots, caring, and not apologizing.


I bought this frame a few years ago and I have been meaning to make this bulletin board for my craft room, so I am so excited to do that as well as having a lovely place to display this banner!  The banner is simple, but made from all sorts of maps reprsenting my hopes for the new year : maps of Portland, Europe, Paris subways, root systems, & a map of the nervous system.  I am glad I'll have this up right in front of my sewing desk to remind me always.


The Creative Collective

I look forward to the 22 other challenges this year!  What word represents your hopes for 2014?

Goodbye 2013, Hello 2014!

01 January 2014

2013 was a year of discovery for me.  From the moment it started, I was in a process of transition.  I learned to let go of my past and redefine myself without many of the things I had grown so attached to. I learned that my sense of self is not defined or shaped mearly by titles and badges that I wear. I also learned that those badges and titles are mine to invent and not anyone else's. I learned that I control my own destiny and I need to start making shit happen.

I traveled to many new places this year. I reached deep and really checked off things that had been on my bucket list for as long as I can remember and in doing this, I chose myself over my fears. There were a lot of ups and downs, but looking back, 2013 was pretty amazing.


Highlights of 2013...
Traveled to New Orleans (a dream of mine for as long as I can remember!) & spent time with a dear friend that I've been missing
Went on my honeymoon to Iceland - saw the Northern Lights, soaked in the Blue Lagoon, and saw some of the most amazing views I've ever seen
Learned a lot about blogging and met some amazing people through it
Reconnected with an old friend and mended a broken friendship
Fostered 2 little kittens - one of which has found a forever home with one of my closest friends!
Got a new tattoo across my back to remind me that the bad times are necessary and only make the good times shine brighter.
Visited Vancouver, B.C.
Held a baby kangaroo
Joined the Portland Preservation Society and found some amazing new friends and endless amounts of inspiration
Found a new job that challenges me in new ways and gave me a chance to give back to the community
Briefly got to met a musician who has had an incredible impact on my life and got to tell her that
Celebrated my first wedding anniversary in the Puget Sound
Harvested lots of amazing food from my garden
Made a dramatic hair change and went red
Turned 30 in the company of many amazing friends


I am looking forward to 2013.  Though I am feeling a little intimidated by stepping into this next chapter of unknown, I am optimistic and I want to take the reins!


In 2014, I hope to...
Focus on my health and have a speedy recovery from surgery
Visit more amazing places I've never seen before
Get back to blogging
Possibly find a new home and explore what home means to me
Learn to embrace change more often
Get to a better place with my career and always strive for balance to prioritize myself.
Get more organized

I think my personal theme for 2014 for will be growth and I am ready for it.
 
Blogging tips