Showing posts with label canning. Show all posts

Jam Sessions : Easy Japanese Picked Sugar Snap Peas

01 July 2014

I love sugar snap peas.  They are the perfect treat in the early summer months.  We grow them every year and I always look forward to the harvest and to seeing them appear in farmers markets.  Ususally I just eat them raw as a snack, but I decided to give pickling them a try (because you know, in Portland, we pickle everything!).


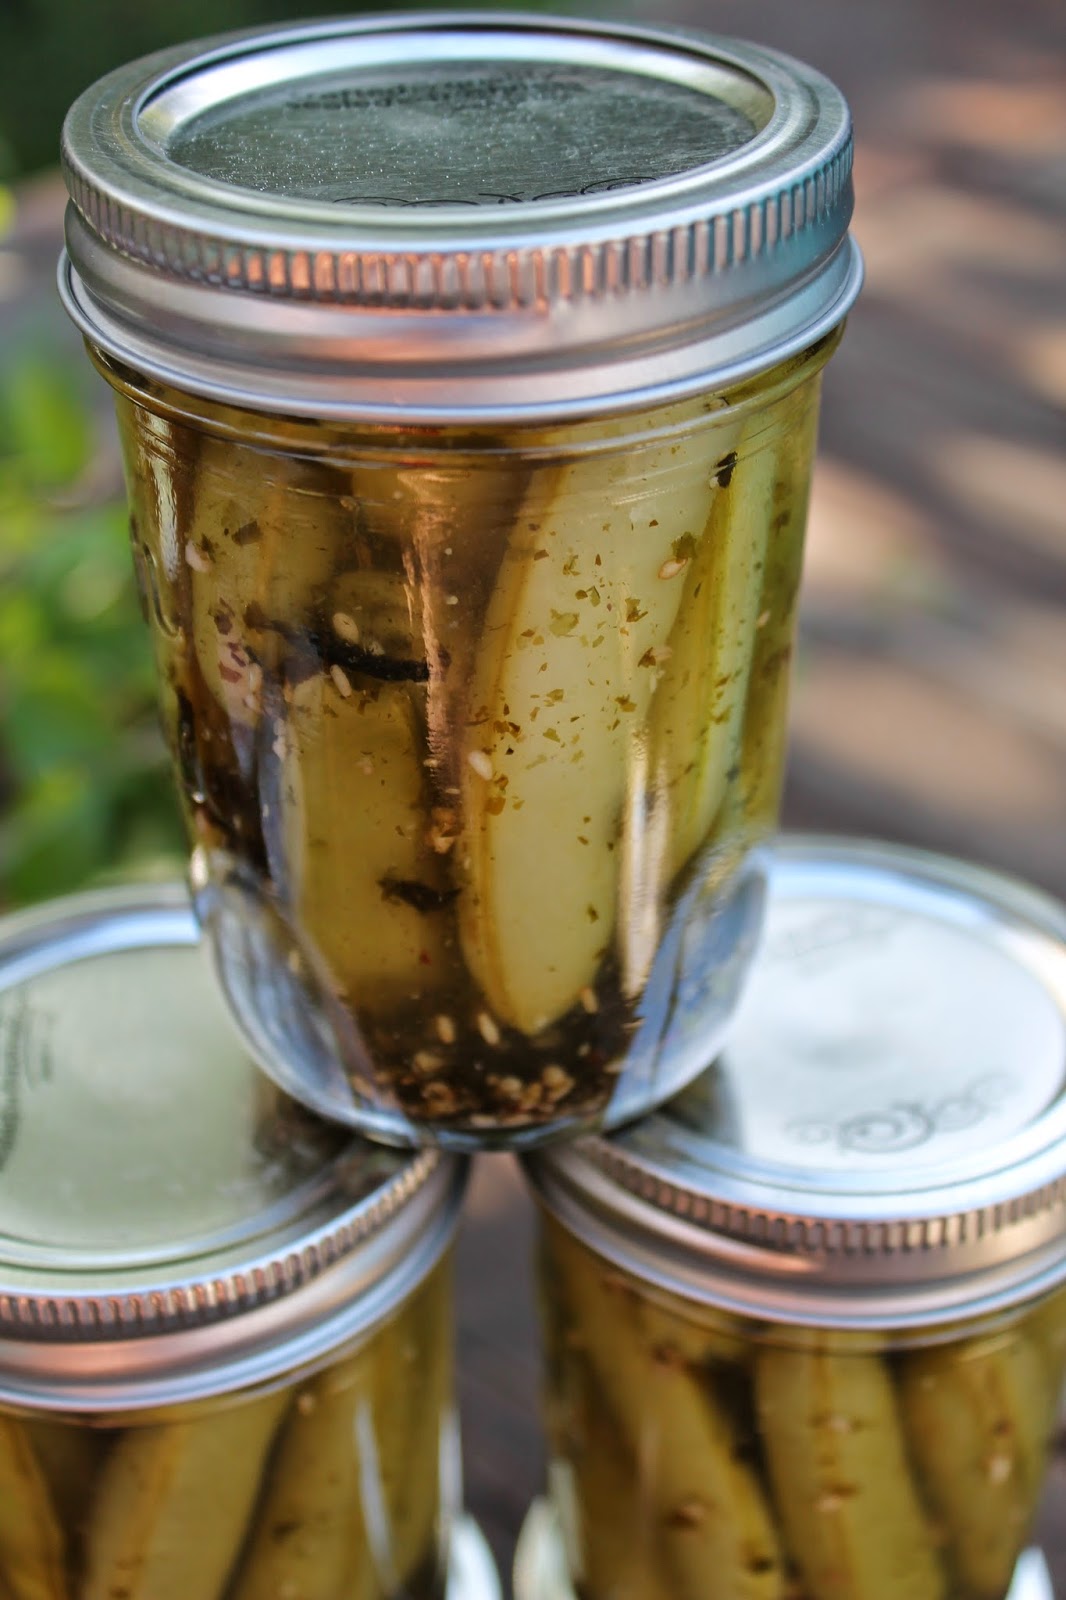
Instead of a standard pickle, I went with an asian style with rice wine vinegar and a simple seasoning of
nori komi furikake.  If furikake isn't already a pantry staple for you, it probably should be!  It's a really simple mix of seasame seeds, salt, and seaweed.  It's traditional use is to make a simple bowl of rice into something magical and flavorful.   If you can't find furikake or don't care for it, you can substitute other seasonings or leave it simple and fresh with garlic and chili flakes.

Quick and Easy Pickled Sugar Snap Peas
Makes about 5 half-pint jars

1+ pound sugar snap peas
2 cups rice wine vinegar
2 cups water
1 tablespoon sugar
1 tablespoon salt
5 tablespoon nori komi furikake (or your own blend of nori and seasame seeds)
1 1/4 teaspoon chili flakes (more if you want a little more heat)
2 chopped garlic cloves

Start by prepping your peas.  Remove the tips and pull off the tough string that runs along the pod.  Wash the peas.  Arrange them into 5 half-pint jars.  
Top each jar with: 1 tablespoon furikake, 1/4+ teaspoon chili flakes, & about 1/4 teaspoon garlic.
Prepare your brine by mixing vinegar, water, sugar, and salt in a small sauce pan and bring to a boil.   Once they sugar is fully dissolved, pour the hot brine into each jar and leave about 1/4" from the brim.
Let them cool on the counter and then screw on the lids and store them in the fridge for up to 2-3 months.

*Note, this recipe is for refrigerator pickles.  It is not safe to can and these jars will not be shelf stable.   They will last for about 2-3 months in the fridge.  The rice vinegar is usually about 4.0 acidity which is too low for canning.  If you wanted to adapt the recipe for canning, you could use white vinegar instead.


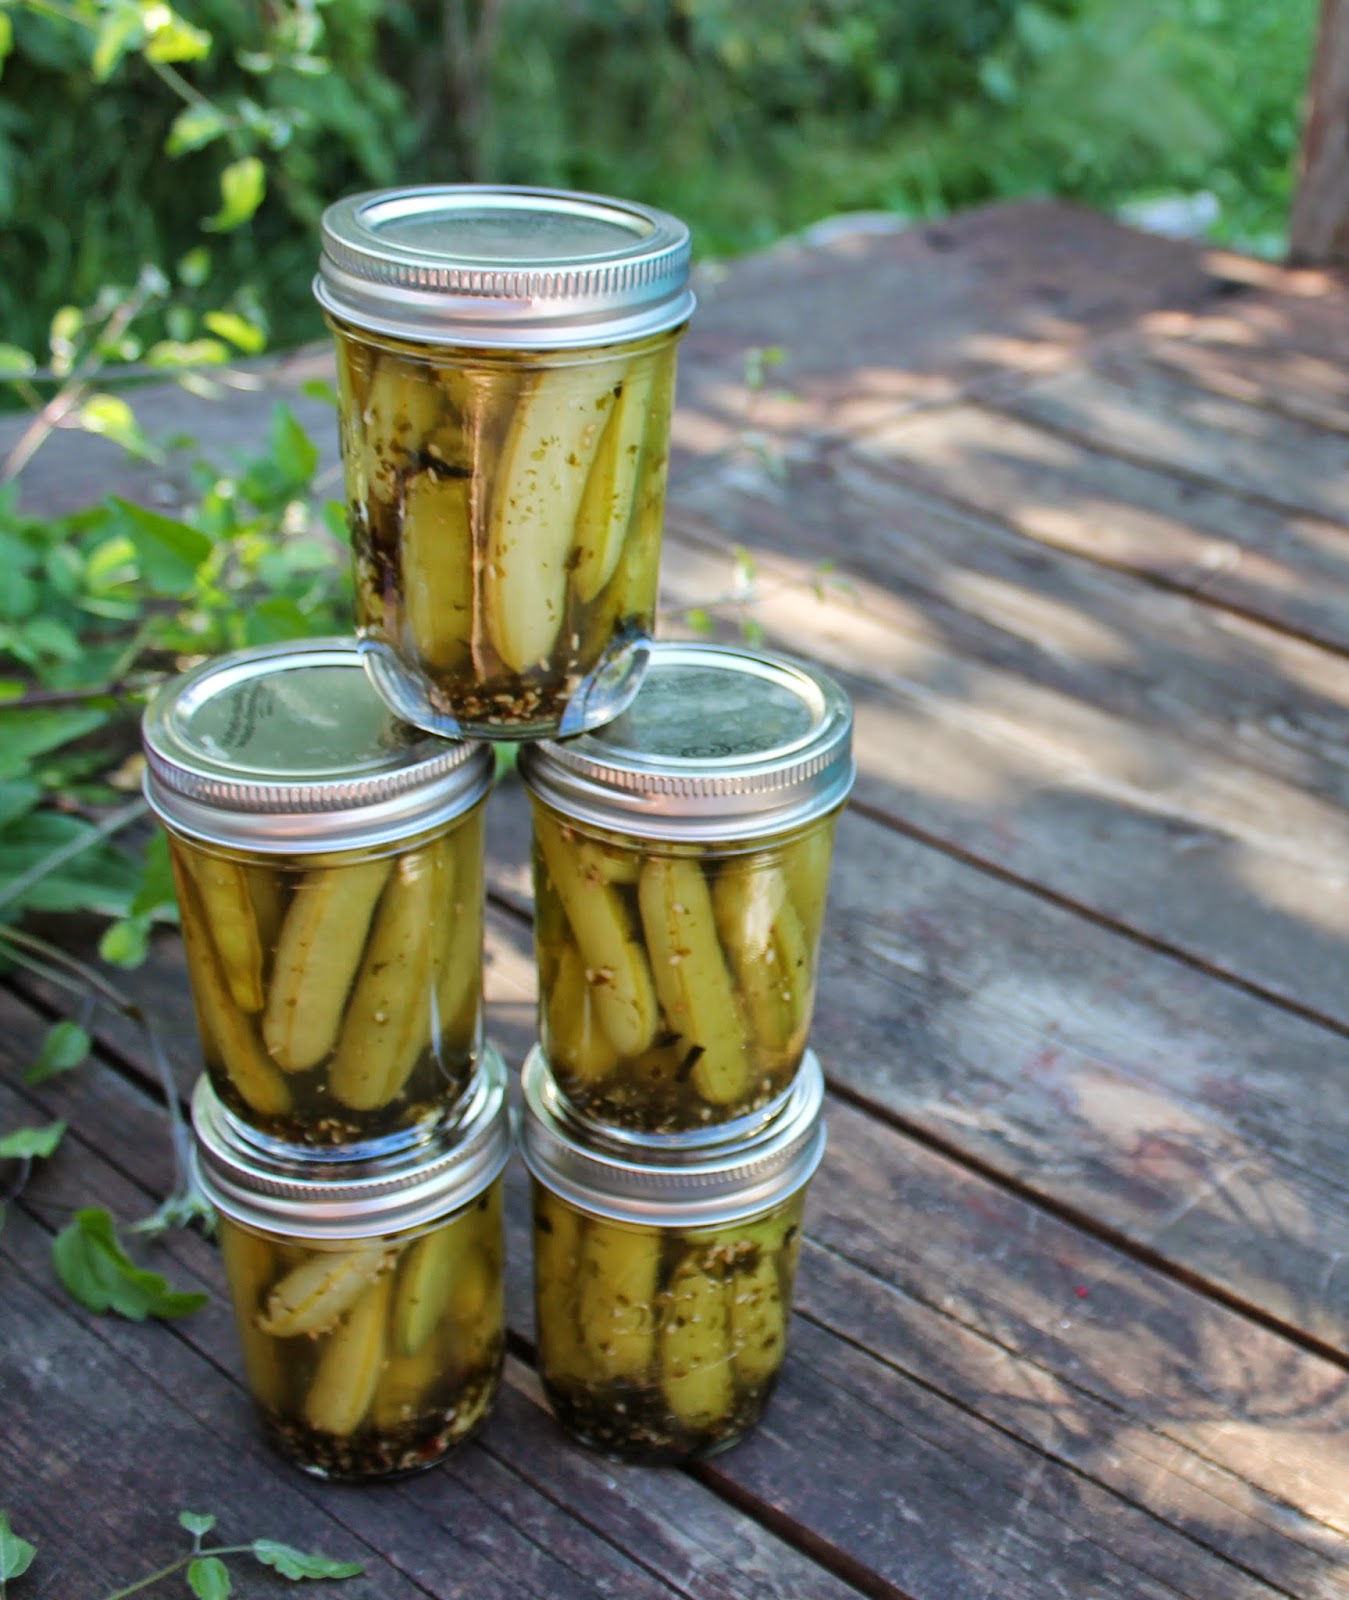
I like to just eat these as a snack, but you could also serve these on a cheese tray or as a light side dish.  They are a delicious and light pickle with a really refreshing summer taste that I just love!

Jam Sessions: Pickling Basics : Spicy Pickled Asparagus!

29 July 2013


Let's talk about pickles, shall we?  Pickling is the act of perserving food using a high acid vinegar solution.  Pickling is really easy.  If you have never canned before, pickling is a great first project because it not very temperamental & it's pretty close to fool proof.  You can pickle just about anything your heart desires - fruit, veggies, eggs, shrimp...ALL THE THINGS!  Let's focus more on the simple veggies and fruit pickling today though!

Pickling requires 3 basic things:
1. Vegetable or fruit to pickle - cucumber, asparagus, cherries, etc
2. Pickling liquid - generally a mix of vinegar with water, perhaps also sugar
3. Seasoning - additives that pack the flavor, mostly herbs or garlic

There are a ton of variations on each one of these components, but you will generally find all of these parts in each pickle recipe.  There are two methods of pickling and each recipe varies on which one to use.  The first is the hot-pack method which involves heating food and putting it in the jar while hot - this menthod expels the air from the food and allows a tighter pack in the jar.  The other is the raw-pack method or cold-pack method which, as you may have guessed, involves not heating the food prior to packing it in the pickling liquid.

The process is pretty basic and the same no matter what you are picking:
1. Sterilize jars & prep your vegetables or fruits (clean & cut them to fit the jars and heat them if hot packing)
2. Put your seasonings in each jar
3. Add vegetables/fruit
4. Fill with hot pickling liquid
5. Process in hot waterbath

Once you have these steps down, you can pretty much pickle anything.  You could also even skip the last step and make refrigerator pickles.

Oh, one more note about pickling!  All vinegars are not created equally.  Each time of vinegar has a different acidity level (white vinegar is much more acidic than champagne vinegar for example), so always use the type called for in your recipe.

Got it?  Great! On with the recipe!

I love asparagus!  Spring and early summer are the perfect times to find these little spheres of deliciousness at your local farmers market or in the grocery store.  When you get tired of roasting or grilling them (but really, how could you get tired of that?), try making them into easy pickles!  I like a spicy pickle, but feel free to omit the pepper flakes if that is not your think.  The herbs added to a pickle can be customized safely.

Spicy Pickled Asparagus

Liquid ratio: 2 cups white vinegar to 1 cup water.
Depending on how many jars you are filling you will need more or less of this liquid mixture.


Per Jar:
1 garlic clove
1/4 tsp red pepper flakes
1 sprig fresh dill (or 1/2 dill seeds)
1/4 tsp salt

1) Wash, snap and trim your asparagus to fit into the size of you jars (I'm using half-pints). Peal the garlic cloves and have them ready to go.

2) Sterilize your jars by dipping them in boiling water for about 5 minutes or use your dishwasher's

3) This recipe calls for raw packing, so snatch up your hot jars and put in all the spices, peppers and garlic at the bottom.  Next, pack them with the asparagus, pack as tightly as you can.

4) Once that is done add the liquid heated to just pre-boil, or boil in a large pot on stove (careful - that gas is not something you want to breath in!). Pour vinegar and water mixture over the asparagus leaving just about 1/2 inch head-space (meaning don't fill all the way up leave 1/2 inch).

5)Heat the right amount of lids in boiling water on the stove, when they are ready place them on the jars and screw on the rings. Process in a waterbath canner for 10 minutes.

6) Remove from canner and place on a counter to let them cool.  Wait at least 2 weeks for the pickling juices to take effect and enjoy!


Canning Starter Package Giveaway!

21 June 2013

This week, I've talked a lot about canning and I really hope that it has gotten you inspired to start your own canning projects!  To help, I've teamed up with Progressive International to offer one of my readers the chance to win some of the tools I talked about yesterday in this amazing Canning Starter Package!


This prize pack includes:


Progressive 3 Piece Canning Essentials Tool Kit - Comes with a a jar grabber - an absolute a must have for any canner to help you safely remove jars from boiling water bath; a lid lifter with magnetic magic to get your lids out of hot water bath safely and easily; and a jar funnel to help you fill your jars quickly and with minimal mess, not only that, but this the thing that makes this funnel really special is that it has marks to show you exactly how much headspace you are leaving to a perfect pour every single time! 
       
Progressive Reversible Stainless Steel Canning Rack: This beauty fits in most 16qt and larger stockpots, so it is perfect & compact to store and bring out on your canning project days.  It is made of stainless steel, so it won't rust.  The best part?  It is reversible  so one side will fit 4 quart jars or just give it a flip to perfectly fit 7 half pints.  AND it is stackable, so you can use multiple racks to process up to 14 jars at a time!

     
1 Dozen Half-Pint Ball Mason Jars - These are my jars of choice.  They are perfect for pretty much any canning project from pickles to jams!

Just add fruit or veggies and you have everything you need to get started with canning...or to add to your current stash of canning supplies!  

  
a Rafflecopter giveaway

Thank you so much for entering and following along!  Good luck! freegrechen.com

Jam Sessions : Basics : Tools of the Trade

20 June 2013

Building on the canning dictionary I shared with you earlier this week, there are a few specific tools that you will probably need if you want to start canning.  Let's go through them, shall we?


A Guide to Canning Tools!
Canning Pot or Canner
 This is the tool that really makes the magic happen - it is used to sterilize the jars and also seal them....and it's really nothing more than a large pot. You can buy commercially sold canning pots, or you can just use any large, heavy duty soup pot in your kitchen. They key is just the addition of the canning rack.

Canning Rack
A shallow (usually metal) rack that elevates the jars slightly off the bottom of the canning pot. The rack keeps the jars from being in direct contact with the heat of the stove and also allows the water to circulate and ensure that it is able to evenly come in contact with all facets of the jars. You can use a rack specifically designed for canning or you can also use a round cake cooling rack that fits in your pot - both do the job!

Pressure Canner
The pressure canner is a special pot that applies pressure during the cooking process & allow the water to reach higher temperatures as a result.  Pressure canners are only necessary if you are planning to can low acid foods. 

Lid Lifter
Lids must be submerged in hot boiling water before they can be used. This process sanitizes them and also helps to soften the rubber for a better seal. This tool is designed in order to remove the lids from the boil. It is not 100% necessary, but it is helpful. It is basically a magnet on the end of a stick.  I happen to have some neat geometric magnets on my fridge that keep my fingers safe and work just as well.

Jar Funnel
A funnel with a wide a opening perfect for the opening of a mason jar. This funnel will basically help you make less of a mess. It's not necessary to use a funnel, you can also just ladle directly into jars, but you'll find there is more clean up to do on the jars before they can be sealed.

Jar Lifter/Grabber
This specially designed tool is essentially a pair of tongs with a circular grasp to pick up mason jars. It's nessisary to safely be able to remove the jars from the boiling water.

And of course there are the beloved mason jars!  Perfect for sprucing up your decor, storing spices, turning into adorable lamps, but of course for canning food!  There are lots of options for jars, so let's talk about that.

There are 3 parts of a mason jar...

Anatomy of a mason jar

Jar: The glass part. Jars are reusable as long as they have no chips or cracks in them, so it's important to inspect them before using.

Lid: The metal circle that fits on the top. Lids have a rubber band that fuses to the glass of the jar and that is what creates your seal. You should not reuse lids and replacement packages are available just about everywhere canning products are sold.

Band: The metal ring that screws around the top of the jar and holds the lid in place. Bands are reusable, but should be cleaned well after use.


There are a multitude of size options to choose from...


Common mason jar sizes

Generally, the size you use is entirely up to you.  I tend to primarily use half-pints or quarter pints for almost all of my projects, but if you have a big family you may find yourself wanting to package your goods in a larger jar.  Half gallon jars are also available and I love to have one or two around for making lemonade  but they are pretty bulking to use for my personal canning projects.

There are two sizes for the lids: regular or wide-mouth.
Wide mouth jars vs regular mouth jars

Obviously wide-mouth jars just have a larger opening at the top.  There is no special science here as to wide-mouth vs regular - it's a matter of personal preference as to which you use, but just remember that if you pick wide-mouth jars, you need to pick wide-mouth lids to match.  I pretty much exclusively use regular mouth jars and it makes it easier for me to be sure that I always have the right lids and bands on hand.


The last thing I want to talk about is pectin
Everything you need to know about pectin for home canning!

It's not really hardware, but it is a really important part of canning if you plan to make jams or jellies and it is something that not everyone is familiar with.  Pectin is a natural gelling agent that is derived from fruits like apples or citrus fruits.  Pectin is the unsung hero of jam and jelly making...it's the ingredient that really makes the magic happen.  You don't need pectin to make jam, but almost all modern jam recipes use pectin and for good reason.  Pectin allows jams to gel with less sugar being added and with significantly less cooking time.  It's a beautiful thing.

Comercial pectin is slightly sweet and doesn't have much of a flavor to it.  You can find pectin at your local grocery store usually in the baking isle with the other canning supplies.  

There are a few different types of pectin, but they all work pretty much the same way:

Powder: The most common state of pectin.  Sold in a small box or in a larger jar.
Liquid: Liquid pectin is basically powdered pectin that has already been disolved.  It is a bit messier and harder to work with in my opinion, but some people swear by it.
Lite or Low-Sugar: Pectin that cuts the typical jam recipe's sugar content down by about 40% vs regular pectin.  It makes the jam a bit better for you, but I also really appreciate the resulting flavor with the low sugar recipes -it's less in your face sweetness and allows the fruit flavor to shine through a bit more.
Freezer Jam Pectin: This is a product designed specifically for making freezer jam and no cooking is necessary to create a gel.  My understanding though is that this pectin can create runny jam more often than not. This product is not intended for traditional canning.  You can use regular pectin for freezer jam, but you can't use this freezer jam pectin for traditional hot water bath canning and it has a bad reputation for not working as well...so, you want my advice? Skip it - use regular pectin and cook your jam even if you plan to freeze it.


That's all for today!  Stay tuned tomorrow for your chance to win some of these awesome tools!

Questions?  Something I didn't cover?  Please don't hesitate to leave me a comment below!

Jam Sessions : Basics : Termonology

18 June 2013

I have been canning for about 10 years.  When I started, it was just once a year - I would pick strawberries and make one big batch of jam and can it.  This was the recipe and the process that brought be back to childhood...back to the kitchen with my mother and grandmother hoisting me up over the stove to stir the thick pot of strawberry jam as the intoxicating sweet smell filled the room.   When I made jam, it made me feel so connected to that memory and to them.

After awhile. I started to realize that there were so many more things that I could do with that big beautiful canning pot.  I started to experiment with other recipes and I started to find all kinds of new inspiration at the local farmers market.  Canning started to become more than just a connection to a memory, but a connection to food and a connection to eating seasonally.   In recent years, as the popularity of canning has risen, it has also given me a community of wonderful and inspiring people that share my love.  I really want to add you to that community and that is why I am doing this series on my blog.

People tell me often that canning is just too intimidating to try. I know it does seem like a lot of information at first. Remember that it's just like any other new craft or multi-step recipe you've done before - there are just some new terms, techniques and steps that you need to learn, but once you get those down your possibilities become limitless! Over the next few weeks, I will share the basics of canning with you - the terms, the hardware, the process, and the troubleshooting...and of course the amazing recipes you can make!   I really hope that you will get inspired and give it a try!

Let's start with some bare bones basics, shall we?  There are quite a few words that will often come up in any canning recipe and the first step is being able to decode those words.  To help, I created a small dictionary of canning lingo that you might come across.  I also included a handy guide to help show you the common different types of canned goods.  The intent here is not to encourage you to memorize all these words, but rather to give you a point of reference when you need it.


chutney
A combination of vegetables and/or fruits, spices and vinegar cooked for a long period of time to develop favorable flavor and texture. Usually with a sweet-sour flavor.

conserve
A soft spread similar to jam, that is made with at least 2 kinds of fruit in addition to nuts or raisins.

jam
A spread made by crushing or chopping whole fruits. Jams are thicker than jellies and tend to contain chunks of fruits.

jelly
A spread made with only fruit juice rather then the whole fruit to form a smooth gel consistency.

marmalade
A spread that contains pieces of citrus fruit and peel evenly suspended in transparent jelly.

pickle
A perserved fruit or vegetable (usually a cucumber) in a vinegar or brine solution

preserves
A spread in which fruit is cooked with sugar to the point where large chunks of fruit or whole fruit (usually berries) are suspended in a syrup base. The texture of preserves is not as smooth as jelly or jam.

relish
A pickled product prepared using chopped fruits and/or vegetables cooked in a seasoned vinegar solution.

fruit butter
A soft spread made by slowly cooking fruit pulp and sugar to a consistency thick enough to mound on a spoon and spread easily. Spices may be added.

fruit curd
A creamy spread made with sugar, eggs and butter, generally flavored with citrus juice and zest. Curds are often not safe for waterbath canning because of their dairy content, so be sure to use a recipe specifically designed to be canned.


citric acid
A powder made from natural acid derived from citrus fruits. Citric acid is often used in recipes to increase the natural acid in the recipe in order to make it safe for canning. Lemon juice or lime juice may also be used for the same function, but each have their own PH level.

fermentation
A reaction caused by intentional growth of yeast, bacteria, or mold in which natural sugars are turned into lactic acid. Examples of fermented canned foods include sauerkraut, kimchi, and some pickles. Fermentation can also

fingertip-tight
The degree to which screw bands are properly applied to fresh preserving jars. Use your fingers to screw band down until resistance is met, then increase to fingertip-tight. Do not use a utensil or the full force of your hand to over-tighten bands.

full rolling boil
A rapid boil. A boil that can not be stirred down. This boil generally occurs at about 220°F (104°C). This stage is essential for attaining a gel when making jams & jellies

headspace
The unfilled space in the canning jar between the top of the food and the lid. Each recipe will specify the amount of headspace needed. This headspace is needed to allow for expansion when the jars are heated and also to form a strong seal once the jars are cool.

hermetic seal
An absolutely airtight container seal which prevents reentry of air or microorganisms into packaged foods.

high-acid food
A food with a pH level of 4.6 or lower. Most tomatoes & fruits (except figs, Asian pears, melons, bananas, dates, papaya, ripe pineapple, persimmons) are naturally high in acid. Citric acid, lemon juice, or vinegar can sometimes be included in a recipe to help raise the acidity. Fermentation can also add acidity. Only high acid foods are safe for waterbath canning.

low-acid food
A food with a pH level higher than 4.6. Vegetables, meat, & seafood are all low acid foods. These are foods that are easier for bacterica to thrive in and need to be processed in a pressure canner to safely perserve them.

pectin
A natural gelling agent that is derived from fruits like apples or citrus fruits. Pectin can be purchased as a powder that is added to softer fruits like strawberries to create a thick jam or jelly. Pectin is available in several varieties including low-sugar or liqud (more on that in the next post!)

pressure canning
The use of a pressure canner to heat-process low acid foods. The pressurized steam inside the canner allows the food to reach higher temperatures and thus can kill the harmful bacteria that can be housed the the low-acid food. Pressure canned food also must be processed for the specified amount of time on the recipe.

processing time
The time in which the filled jars need to remain in the waterbath or pressure canner. The processing time is specified in most recipes and can have variances depending on your altitude. The amount of processing time depends on many factors including the acidity level, size of jar, and type of food. The process time allows every bit of the jar to be heated to the sufficient temperature.

reprocessing
Repeating the heat processing of filled, capped jars when a lid does not seal within 24 hours. The original lid must be removed and the food and/or liquid reheated as recommended by the recipe. The food and/or liquid must be packed into clean, hot jars and covered with a new, clean lid with the screw band adjusted. The filled jars must then be reprocessed using the preserving method and full length of processing time recommended by the recipe.

spoilage
The evidence that a food product has not been completely rid of microorganisms. If microorganisms are present, the nutrients in the food product will allow them to grow and multiply. Spoilage occurs when food products have not been processed correctly. Signs of spoilage include broken seals, mold, gassiness, cloudiness, spurting liquid, seepage, yeast growth, fermentation, slime and disagreeable odors.

sterilization
The process of killing bacteria. Achieved by heating empty jars to a high temperature prior to filling them & then heating them again once full.

waterbath method / boiling water method
The simplest method to preserve high-acid foods. Using a waterbath canner, water is heated to at least 212°F (100°C) to destroy molds, yeasts, and bacteria & also to seal the jar lids. The jars must be kept in the canner and covered by at least 2" of water for the specified processing time in the recipe. You should not use this method for low acid foods


This list is of course very incomplete, there are limitless possibilities when canning.  This is really just the beginning, so stay tuned for more canning basics, recipes, and even a giveaway!!

Pacific Rim Mango Chutney

20 April 2013

I've been luck enough to have the chance to try out a few products from Blue Heron Herbary - they are really wonderful herb farm just outside of Portland & have recently released a line of infused vinegars. One of my favorite infusions it the Pacific Rim - it's a blend of rice wine vinegar, fennel, green chives, lemon grass, licorice root, star anise, and ginger. As soon as I smelled it, I immediately thought chutney!


I adore mango chutney because it is sweet, but still really stands up to anything you add it to and mangoes just so happen to be in season right now! Chutney is really versitile. It is traditionally served as a sweet balancing side dish for a spicy curry dishes, but you can use it for a number of things.  I made a delicious fruity salad by mixing chutney a bit with lime juice, olive oil, and a touch of honey - perfect dish for those spring days.  It's also lovely with meats, cheeses (cream, blue, or goat are my favorites), or as a condiment for your leftover turkey sandwich!


Pacific Rim Mango Chutney
Makes 3 pints
2 cups sugar
1 cup Pacific Rim vinegar
1 tablespoon lemon juice or citric acid
6 cups of peeled & chopped mangoes - slightly underripe (about 6 mangoes)
1 medium onion, chopped (about 1 cup)
1/2 cup golden raisins
1/4 cup crystallized ginger, finely chopped (or 1 1/2 tablespoons ginger paste)
1 garlic clove, minced
1 teaspoon ground coriander
1/2 teaspoon ground fennel seeds
1/4 teaspoon ground star anise (or ground cloves)
1/2 teaspoon red chili flakes (add more or less depending on your heat preference)

Combine sugar, vinegar, & lemon juice in a large pot. Bring to a boil and stir until sugar dissolves.
Add remaining ingredients and simmer uncovered for about an hour to an hour and a half. The longer you cook it, the thicker your chutney will be, so the time is all about your preference (remember that it will thicken a bit more once cooled), but you want it to at least get all the ingredients nice and softened & get a bit of a syrupy texture.
Ladle hot mixture into sterilized jars & process in a water bath for 20 minutes.

Note: You could substitute a regular rice wine or white vinegar for the Pacific Rim, but you will loose a bit of flavor.  If you choose to do white or apple cider vinegar, you could omit the lemon juice or citric acid since those vingers contain a higher acid level than rice wine vinegar.  I do think the rice wine vinegar & lemon juice combination creates are more well-rounded soft flavor that is a bit less abrasive than other vinegars.  

Winter Canning: Tarragon & Champagne Mustard

08 February 2013

Just because it is winter, it doesn't mean that there are not plenty of things worth breaking your canning pot out for!  This mustard is really simple to make any time of year.  It has a beautiful earthy flavor with a bit of that mustard spicy kick that you'd expect, but the tarragon adds a really lovely soft note of freshness and mellows out the mustard.  Champagne vinegar also adds just a bit of sweetness to mellow out the spice of the mustard.


4 tablespoons mustard seeds
10 tablespoons champagne vinegar
2 cups mustard powder
1 cup light brown sugar
1 teaspoon salt
7 tablespoons virgin olive oil
8 tablespoons of chopped fresh tarragon

The night before, put the mustard seeds and vinegar in a bowl and allow them to soak overnight.

The next day, just combine you seeds & vinegar along with mustard powder, sugar, and salt in a food processor or blender.  Blend until smooth and then slowly add your oil as it continues to blend.  Move your mixture into a bowl and use a spoon to mix in the chopped tarragon.  Ladle into sterilized jars and process in a hot water bath for 10 minutes.

Makes about 18oz (1.25 pints).  I made this recipe in cute little quarter pint jars and got exactly 5 jars.  This is a recipe that you could very easily double or triple as long as your food processor can handle it.  Also, if you are not a fan of tarragon, you could substitute another herb (I think rosemary would also be lovely, but since it is significantly more powerful, I would recommend using less).


I admit, I am not the world's biggest mustard fan, but this mustard is really unique and full of flavor without being too spicy.  It absolutely makes a boring ham sandwich into a really special meal.

Fig Jam

14 July 2010

I am in love...with a sandwich. It's a very simple sandwich, but it rocks my world. Bagette + goat cheese + ham + fig jam = absolute perfection. I have not had an easy time finding said fig jam in the grocery store, so I was so excited to see fresh figs at the farm this weekend! I made a tiny batch to start and I cannot wait for fig season to be in full swing over the next few weeks so I can stock up.

IMG_0920

Figs are a little fruit that I have not had the good fortune to be able to experience much in my life and now that I have found them, I don't ever want to live without them. They are also just so beautiful. The color inside is so perfect.

5 cups chopped figs (about 2 dozen large figs) - stem and ends removed
1 1/4 package of low sugar pectin
3 cups sugar
1/4 cup lemon juice

You may want to peel your figs for astetics, but I think that is far more fuss than it's worth. Throw your figs into a large pot and mash up a bit with a potato masher. Add your pectin (mixed with 1/2 cup sugar) and bring them to a hard boil (one that cannot be stirred away). Once you are at a good boil, whisk in the rest of the sugar. You can add an extra cup of sugar if you want a sweeter jam - this recipe is really for a more subtle and less sweet blend that I can use in savory things. Bring back to a boil and let boil for one solid minute. Remove from heat. Check for jell with that handy spoon trick I told you about yesterday. Once you have the right consistency, fill up your jars and give them a good 10 minute process in the hot water bath.

Start making yourself some delicious sandwiches or serve with cheese and crackers at your next party!

Lavender-Peach Jam

13 July 2010

Lavender adds such a unique floral sweetness to any dish you put it in and it is just lovely to look at. There is a cute little lavender farm just outside of Portland where I was able to pick a big bunch of lovely purple buds fresh from the feild.

I decided that peaches would be the perfect partner for lavender because they are so sweet, clean, and mild. The flavors in the jam mix perfectly. I like the strong floral umpf that the flowers offer, so I was a little heavy handed with it - but if you are a little shy on florals you can just use tea without adding the buds.

IMG_0898

The first step is to make a lavender "tea". Mix 1/2 cup of hot water with 2 tablespoons of lavender buds. Mix over high heat until the mix comes to a boil. Take off the heat and leave to cool completely (30+ minutes). Then drain out the buds to collect a lovely fragrant purple tea.

IMG_0908

Next, start work on your peaches. You will want to remove the skins because they can be bitter and chewy. The easiest way to peel peaches is to put them into boiling water for 30 seconds, then drop them into an ice water bath. The skin will rub right off. Once the skin is off, you can dice your peaches and put them into a large pot. Mash your peaches down a bit with a potato masher and turn the heat to medium-high. Add your lemon juice, lavender tea, and buds.

The amount of sugar that you need will depend on which type of pectin you use, so be sure to check that little handy guide that comes inside your pectin box. This recipe is based on using a low sugar pectin formula. The low sugar pectin is always my go-to becuase it produces a solid jell with a sweet flavor without being completely overwhelmed with sugar. It also is availabe just as readily as the traditional high sugar kind. If you are using a regular pectin, you will probably need about 8 cups of sugar.

Take 1/4 cup sugar and stir it into the package of powdered pectin. This will help the pectin to not clump up. Add to the peach mixture and stir well. Bring to a rolling boil - one that you are not able to stir away. Once you are at a good soild boil, add the rest of the sugar and stir. Bring back up to that strong boil and let boil for exactly one minute. Remove from the heat.

To check your jam for consistency, I like to keep a metal spoon in icewater ready. Scoop a bit of the jam and let it cool completely (the freezer can help with that). Once the jam cools, you can make sure it is the jelly consistency that you like. If it is too runny, you can add more pectin and boil for one more minute.

Once you are at the right consistency, you can start filling your jars! Process for 10 minutes in a hot water bath. You can also make this a freezer jam or just make a small batch to enjoy that week (don't worry, it won't last long!) if you don't want to fuss with the canning process.

IMG_0953

This jam would make an excellent sweet marinade on meat or just a perfect element for your toast!

Jam Week!

11 July 2010

One of my very favorite childhood memories is of making jam. When I was a little girl, my mother and grandmother would take me to pick strawberries in the feilds of Styer Orchards and then we would make huge batches of strawberry jam. That vivid memory of perfect summer days, the sweet smell of cooking berries, and 3 generations together in the kitchen is really what motivated me to learn to make jams on my own. There is something really wonderful and special about connecting to the past and traditions in the form of food.

The process of canning may seem a little intimadating, but it has come a long way since my gradmother's kitchen and it just takes a little practice to master.

The best online resource for any begining jam maker is definitely pickyourown.org...they offer a comprensive step by step guide (with photo of each step) for most basic recipes. They also sell supplies.

Speaking of supplies, in order to start canning, you will need a few basic items. I suggest you start with the essensials at first and then you can add more specialized items to your arsenal from there...

The first thing you need is a canning pot (or "canner") - you can find them online or at most major stores (I've seen them at Fred Meyer & Walmart) for about $25, but I see them constantly at thrift stores and estate sales for a couple of dollars - so it is probably worth keeping an eye out. The canning pots should come with with a wire rack that fits into the bottom to keep your jars from banging together and keep direct heat off the bottom of the jar.

You also need to select the size and style of jars you want to use. When it comes to jam, I prefer half-pint and 4oz jars. The jam will last for 1 year in the cabinet, but once your jam is opened it has a more limited life in the fridge, so I just think the smaller jars are more practical. I also like that I can make more jars to share with friends. Larger full pint and quart jars are perfect for sauces and veggie canning. You can reuse your jars and the rings year after year as long as you are careful to inspect them for chips or fractures before using. The top lid piece of the jars is the only part that will need to be replaced with each use (it has a rubber gum that assists in the sealing process).

Other tools you need to get started: a nice big pot to make your jam, ladle, and tongs or a jar lifter. Jar lifter tool is really a wonderful thing to own if you are doing any kind of canning. You can use tongs to get the jars out, but the jar lifter will save you a lot of aggrivation and will be well worth the 5 bucks.

Once you get all the basics down, you are ready to start making jam!

This summer, I am working on some non-traditional jams. I will be posting a new recipe each day this week! Welcome to Jam Week!
 
Blogging tips