Jam Sessions : The Basics: Testing for Gel

29 June 2013

I hope you guys are not sick of this canning series yet because I am still really excited to be able to share it all with you and I have so many recipes and tips to share!  Earlier this week, I went through the process for making jam.   There is one thing I left out of that post because I thought it needed it's own post - it's called "testing for gel".  It's much easier than it sounds. Testing for gel is simply making sure your jam pectin has done it's job and made that "jammy texture".

Do you have to test for gel?
Nope, you can absolutely skip that step but you may end up kicking yourself if you do. The process is simple and it gives you a chance to make sure all your hard work is producing the kind of product you like and it also gives you a chance to fix it if it is not quite right. Once you scoop that jam into jars and give them a bath - it's over & the jam is what it is. Taking a moment to test for gel will just give you confidence that you are making a great batch of jam.

 Here's how you do it:
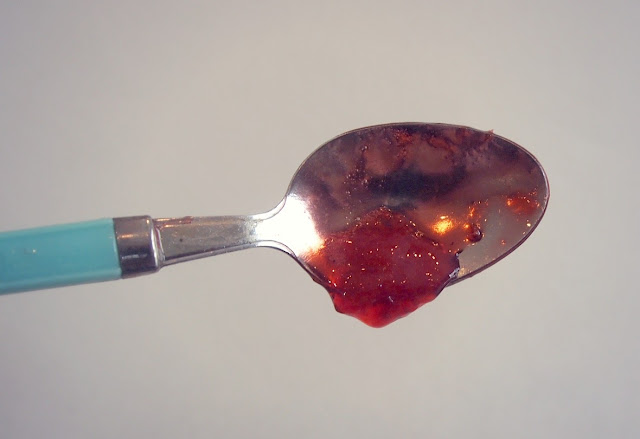
When you are starting your whole process and doing prep, take a metal teaspoon out of the drawer and put it down in some ice water (or throw it in the freezer - but if you put it in the freezer be sure to use a hot pad or something when taking it out! Cold metal + skin = ouch) and let it get nice and cold while you are working on your jam. After you have brought your jam to the second boil (the first boil is with fruit & pectin, then adding the sugar will require an additional "bring to a boil" phase) and all your ingredients are in, it is time for the gel test. Take that spoon and dip it in to get a little spoonful. Set that spoonful down for a minute or two and let it cool completely. Once it cools, you can turn it to the side to see how it flows off the spoon to eyeball the gel - but I like to just touch it. It's easier for me to feel the texture than see it. It should feel thick, but not too solid.


How to test for gel when canning.  Diagnostics to help fix your batch before you end up with runny jam.
This is pretty ideal for me. The texture holds together like a solid, but still has movement.

Now on to the diagnostics that come up when testing. There are 3 common things that you may discover in your gel test:

Jam stays very liquid and runny even though it is completely cool. This is probably the most common problem and the good news is that it is an easy one to fix! It means you were short on pectin, sugar, or did not let it get to a hard boil. Just add another half packet of pectin to your jam and bring to a hard boil for one more minute. The hard boil is important. Don't get nervous or over excited and just simmer for a minute, that just won't activate the pectin in the way you need to with jam.

It's stiff and feels like hard jello. If you jam is stiffer than you'd like then this could be a result of several things: your pectin to fruit ratio is off (check the recipe just to be sure); it's been overcooked (letting the second hard boil happen for just one minute rather than 10 really is important after all).  If this happens, there is not much you can do to repair the batch, but you should still save it - It will melt down nicely to make a lovely syrup topping for ice cream or a marinate for your chicken. All is not lost, you just need to get creative!

The jam is crunchy. The good news is that this is probably a really basic error, it's another overcooking issue, so next time you will keep a better eye on it, right? The bad news is, you can't really fix it. You took your sugar and brought it to the "hard ball stage" of sugar crystallization as most confectioners call it...it's trying to become a hard candy.  I suppose the best you could do it go ahead and cook it fully to make some yummy crystal candy!  I've never really had this happen to me after 100+ batches of jam, so don't worry much about this!

It takes time to figure this part out. If you've never made jam before, it may take a bit of time to get this gel test down perfectly, but give it a shot!  You won't learn until you try.  And if you have questions, get in touch, I would be happy to do my best to answer them!

Jam Sessions : Basics : Let's Make Some Jam!

27 June 2013

We've talked about the canning lingo and we've talked the tools that you need to get started, so let's make some jam and get to canning, shall we?  It seems pretty fitting to start with some good old fashioned strawberry jam!


There are few things to me that are more simplicity beautiful than homemade strawberry jam.  It's soft sweetness brings me back to beautiful childhood memories.  Once you make your own strawberry jam, you will never want to buy grocery store jam again.

This recipe is my tried and true secret strawberry jam recipe.  I've been perfecting this recipe for almost a decade & it even won me a red ribbon when I entered it in the Oregon State Fair a few years ago!  It's really a simple take on an old fashioned recipe with just a few dashes of updating.

There are two parts to this process - making the jam and then the canning process. Both parts are simple and just require a few basic steps.  The wonderful thing is that once you get that second part down, that is what you need to be able to make any kind of jam, jelly, relish, or pickle your heart desires.  This may seem like a lot, but don't be intimidated!


Makes about 7 half pint jars

1 box of low sugar pectin
5 cups of  chopped strawberries, raspberries, or blackberries
4 cups of granulated sugar
2 tablespoons lemon juice
1 tablespoon balsamic vinegar (optional)
1 teaspoon salt (optional)

The key to making jam successfully & stress-free is preparation.  Once you get started, you need to work pretty quickly & the steps require a lot of attention, so getting prepared will help you tremendously.  The first preparation is your fruit.

Old fashioned strawberry jam!  A simple step by step guide.
Hull your berries and roughly chop.  Mush with a potato masher - just enough to break it all down, but still leaving some nice whole chunks of fruit in the mix.*  Measure it out and also measure your sugar and set aside.

Next, you want all of your supplies ready. You want everything you you need right at your fingertips before you start. Click here for the hardware guide to see what tools you need.

Heat your waterbath (aka large pot of water with your canning rack inside) over high heat, it will take a bit of time to get to full boil. As soon as it reaches a full boil, you want to put your empty jars in. They need to be in the hot waterbath for about 10 minutes or so to sterilize them. You will remove them as soon as it is time to can. You can also use your dishwasher if there's a sterilization and heat hold setting.

Mix 1/4 cup sugar with 1 box of pectin. Stir together with a fork.  I add the sugar to help keep the pectin from clumping.

Combine your berries, lemon juice, and pectin in a large pot. Add the balsamic & salt - these are both my secret ingredients to help round out the flavors just a bit and boost the natural strawberry flavor, but they aren't traditionally added, so feel free to skip them. Cook on high heat, stirring often.  Bring to a rolling boil. (this is rolling boil #1).

Once you have a nice boil, add all the sugar and stir well.  Keep on stirring.  This is the part where you do not want to take your eyes of your jam because it will be quick to burn.  Bring back to a rolling boil. (that is rolling boil #2).  Boil, stirring constantly, for one minute.

After one minute, your jam will start to thicken, but it will be a little hard to tell just what the final cool consistency will be since it is so hot.  At this point you want to test for gel to make sure it set to that perfect jammy texture.

Your jam will have a top layer that is foamy and lighter colored.  This is totally normal, just skim of this layer with a spoon and put it into tupperware.  The foam is delicious and perfectly safe to eat, it can just make your jam look a little unsightly and discolored if you leave it in, so skim and keep it in the fridge to enjoy first.

*I like to do this step the day before.  It is a big project to take on, so I think it is nice to have that taken care of in advance.  If you prepare the fruit in advance,  1/2 cup of sugar to the chopped berries & store in the fridge to allow it to macerate and really absorb some sugar and create lovely maceration.  It's not necessary, but it's a nice touch.

Congratulations!  You made jam!  You could stop here and just put your batch in the fridge and devour it within a few weeks, but what is the fun in that?  This is a canning lesson, so let's can it!

This is where the magic happens that lets your jam last in your cupboard for up to a whole year.  It's actually way easier than the jam part...just a few quick steps!  Once you have this basic canning process down, you can pretty much can anything!  The very same steps are used to can pickles, jelly, chutney, sauces, ect.  The difference will just come in the processing time, so be sure to just follow your recipe.

A simple step by step guide to home canning.

You already started sterilizing your jars while you were making jam, so they should be ready to pull from the water.  Do this right before you are ready to can because you want the jars to be nice and hot and freshly sterilized.

Once those jars are out, go ahead and ladle your hot jam into hot, sterilized jars.  You can use the jar funnel to make this easier and less messy.  Leave 1/4" headspace.

Wipe the top of the jars with a wet paper towel to remove any excess jam.  A messy top could make it difficult for the jars to seal.

Get your lids in a small pot of hot (not boiling) water for a few minutes.  This sterilizes your lids also helps to soften the rubber around the edges that will create the seal.  Pull the lids out of the boiling water using your magnetic lid lifter.  Place them on top of the jars.  Screw your bands around the top so that they are nice and tight (careful, the jars are hot, so an ovenmit or kitchen towel comes in handy to protect you hands).

Use your jar grabber to put your jars into the boiling waterbath.  Be sure they are covered with at least 2" of water.

Generally, you process jam for 5-15 minutes depending on your altitude.  If you at an altitude of lower than 1,000 feet above sea level - 5 minutes, 1,000-6,000 ft - 10 minutes, 6,000+ ft above sea level - 15 minutes.  The processing time is important because it is what creates the seal, but you don't want to over process because it will overcook the jam.  When in doubt, the extra five minutes won't hurt.

Remove your jars and let them sit on the counter at room temperature for at least 24 hours.  They will make some popping noises during this time, but that is ok!  The next day, check your jars for a seal.  If they are fully sealed, there will be no give to the jar lid.  If they did not seal, it will make a popping noise when you press down and you will feel the lid flex.  If this happens and they did not seal, that is ok too!  Just put that one in the fridge an eat it first.  It will stay in the fridge for about a month.

Once cooled, they are ready to store in your pantry for up to one year or to be given as lovely gifts!

Old fashioned strawberry jam!  A simple step by step guide.


See?  It's not so hard!  I hope you will give it a try in your own home and please don't hesitate to leave a comment and ask any questions you might have!  And don't forget, there is still a few more days to enter to win all the supplies you need to make jam at home!

Pupsicles Recipe!

25 June 2013


Today, I am doing a guest post over at the Nectar Collective to share my favorite summertime frozen dog treat recipes!  Be sure to go check it out - not only will you find a recipe, but you will also discover how lovely and amazing Melyssa's blog is!

Feel free to try the recipes out and send me cute photos of your dogs, I promise I won't mind that at all! ;)

Canning Starter Package Giveaway!

21 June 2013

This week, I've talked a lot about canning and I really hope that it has gotten you inspired to start your own canning projects!  To help, I've teamed up with Progressive International to offer one of my readers the chance to win some of the tools I talked about yesterday in this amazing Canning Starter Package!


This prize pack includes:


Progressive 3 Piece Canning Essentials Tool Kit - Comes with a a jar grabber - an absolute a must have for any canner to help you safely remove jars from boiling water bath; a lid lifter with magnetic magic to get your lids out of hot water bath safely and easily; and a jar funnel to help you fill your jars quickly and with minimal mess, not only that, but this the thing that makes this funnel really special is that it has marks to show you exactly how much headspace you are leaving to a perfect pour every single time! 
       
Progressive Reversible Stainless Steel Canning Rack: This beauty fits in most 16qt and larger stockpots, so it is perfect & compact to store and bring out on your canning project days.  It is made of stainless steel, so it won't rust.  The best part?  It is reversible  so one side will fit 4 quart jars or just give it a flip to perfectly fit 7 half pints.  AND it is stackable, so you can use multiple racks to process up to 14 jars at a time!

     
1 Dozen Half-Pint Ball Mason Jars - These are my jars of choice.  They are perfect for pretty much any canning project from pickles to jams!

Just add fruit or veggies and you have everything you need to get started with canning...or to add to your current stash of canning supplies!  

  
a Rafflecopter giveaway

Thank you so much for entering and following along!  Good luck! freegrechen.com

Jam Sessions : Basics : Tools of the Trade

20 June 2013

Building on the canning dictionary I shared with you earlier this week, there are a few specific tools that you will probably need if you want to start canning.  Let's go through them, shall we?


A Guide to Canning Tools!
Canning Pot or Canner
 This is the tool that really makes the magic happen - it is used to sterilize the jars and also seal them....and it's really nothing more than a large pot. You can buy commercially sold canning pots, or you can just use any large, heavy duty soup pot in your kitchen. They key is just the addition of the canning rack.

Canning Rack
A shallow (usually metal) rack that elevates the jars slightly off the bottom of the canning pot. The rack keeps the jars from being in direct contact with the heat of the stove and also allows the water to circulate and ensure that it is able to evenly come in contact with all facets of the jars. You can use a rack specifically designed for canning or you can also use a round cake cooling rack that fits in your pot - both do the job!

Pressure Canner
The pressure canner is a special pot that applies pressure during the cooking process & allow the water to reach higher temperatures as a result.  Pressure canners are only necessary if you are planning to can low acid foods. 

Lid Lifter
Lids must be submerged in hot boiling water before they can be used. This process sanitizes them and also helps to soften the rubber for a better seal. This tool is designed in order to remove the lids from the boil. It is not 100% necessary, but it is helpful. It is basically a magnet on the end of a stick.  I happen to have some neat geometric magnets on my fridge that keep my fingers safe and work just as well.

Jar Funnel
A funnel with a wide a opening perfect for the opening of a mason jar. This funnel will basically help you make less of a mess. It's not necessary to use a funnel, you can also just ladle directly into jars, but you'll find there is more clean up to do on the jars before they can be sealed.

Jar Lifter/Grabber
This specially designed tool is essentially a pair of tongs with a circular grasp to pick up mason jars. It's nessisary to safely be able to remove the jars from the boiling water.

And of course there are the beloved mason jars!  Perfect for sprucing up your decor, storing spices, turning into adorable lamps, but of course for canning food!  There are lots of options for jars, so let's talk about that.

There are 3 parts of a mason jar...

Anatomy of a mason jar

Jar: The glass part. Jars are reusable as long as they have no chips or cracks in them, so it's important to inspect them before using.

Lid: The metal circle that fits on the top. Lids have a rubber band that fuses to the glass of the jar and that is what creates your seal. You should not reuse lids and replacement packages are available just about everywhere canning products are sold.

Band: The metal ring that screws around the top of the jar and holds the lid in place. Bands are reusable, but should be cleaned well after use.


There are a multitude of size options to choose from...


Common mason jar sizes

Generally, the size you use is entirely up to you.  I tend to primarily use half-pints or quarter pints for almost all of my projects, but if you have a big family you may find yourself wanting to package your goods in a larger jar.  Half gallon jars are also available and I love to have one or two around for making lemonade  but they are pretty bulking to use for my personal canning projects.

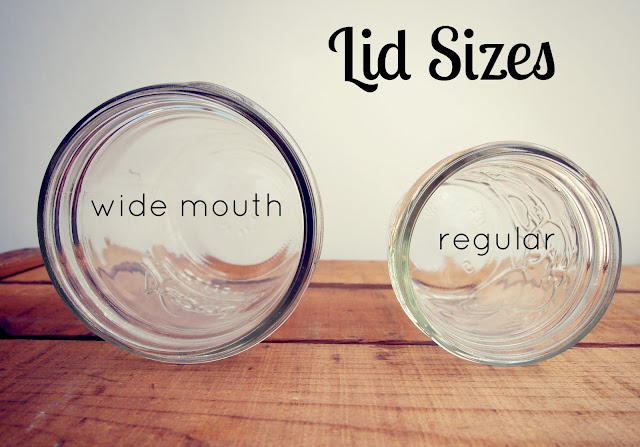
There are two sizes for the lids: regular or wide-mouth.
Wide mouth jars vs regular mouth jars

Obviously wide-mouth jars just have a larger opening at the top.  There is no special science here as to wide-mouth vs regular - it's a matter of personal preference as to which you use, but just remember that if you pick wide-mouth jars, you need to pick wide-mouth lids to match.  I pretty much exclusively use regular mouth jars and it makes it easier for me to be sure that I always have the right lids and bands on hand.


The last thing I want to talk about is pectin
Everything you need to know about pectin for home canning!

It's not really hardware, but it is a really important part of canning if you plan to make jams or jellies and it is something that not everyone is familiar with.  Pectin is a natural gelling agent that is derived from fruits like apples or citrus fruits.  Pectin is the unsung hero of jam and jelly making...it's the ingredient that really makes the magic happen.  You don't need pectin to make jam, but almost all modern jam recipes use pectin and for good reason.  Pectin allows jams to gel with less sugar being added and with significantly less cooking time.  It's a beautiful thing.

Comercial pectin is slightly sweet and doesn't have much of a flavor to it.  You can find pectin at your local grocery store usually in the baking isle with the other canning supplies.  

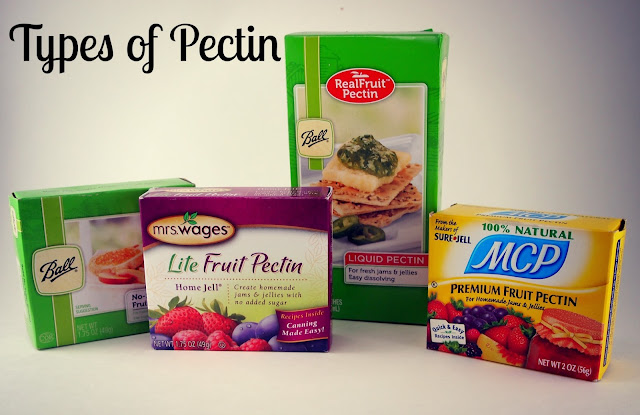
There are a few different types of pectin, but they all work pretty much the same way:

Powder: The most common state of pectin.  Sold in a small box or in a larger jar.
Liquid: Liquid pectin is basically powdered pectin that has already been disolved.  It is a bit messier and harder to work with in my opinion, but some people swear by it.
Lite or Low-Sugar: Pectin that cuts the typical jam recipe's sugar content down by about 40% vs regular pectin.  It makes the jam a bit better for you, but I also really appreciate the resulting flavor with the low sugar recipes -it's less in your face sweetness and allows the fruit flavor to shine through a bit more.
Freezer Jam Pectin: This is a product designed specifically for making freezer jam and no cooking is necessary to create a gel.  My understanding though is that this pectin can create runny jam more often than not. This product is not intended for traditional canning.  You can use regular pectin for freezer jam, but you can't use this freezer jam pectin for traditional hot water bath canning and it has a bad reputation for not working as well...so, you want my advice? Skip it - use regular pectin and cook your jam even if you plan to freeze it.


That's all for today!  Stay tuned tomorrow for your chance to win some of these awesome tools!

Questions?  Something I didn't cover?  Please don't hesitate to leave me a comment below!

Just a Few Things that Make Me Smile...

19 June 2013

I've had a pretty busy few weeks!  I guess that is just how Portland summertime always is - there is always something wonderful to do.  In an effort to slow down and stop to smell the roses, here are a few amazing things that have made me smile lately...

We have foster kittens!  A pair of little blue-eyed siamese boys that are melting my heart!  They were terrified when I first got them, but they are warming up quickly and getting more and more playful every day.  They will probably live with us for about a month until they are big enough to be neutered and adopted out.  I assure you that my instagram will be blowing up with cute kitten photos this month!


I went camping last weekend with a couple of friends & had a really lovely time. It was really my first time camping (well, kinda camping...there was a yurt with a bed and lights, but let's just call it camping!). We stayed at an adorable campsite right on the Oregon Coast and made a fire on the beach while we watched the sunset. Having a campfire on the beach was one of my bucketlist items, so it was pretty dreamy.


The garden is starting to have the first harvests of the season. Sugar snap peas and these beautiful radishes are the first, but we have some zucchini and tomatoes that are almost there! I can't wait!


Speaking of harvests, it is strawberry season! I am so excited because Oregon strawberries are like nothing I've ever eaten. I've been pumping out strawberry recipes like crazy. Tomorrow I plan on going out to the farms and picking up another flat to make some good old fashioned strawberry jam.


We took a spontaneous visit to the zoo a couple of weeks ago. These adorable baby monkey melted my heart a little.  Look at that face!


I have been really enjoying all of the wonderful canned goods I came home with after the Portland Preservation Society meeting earlier this month - blackberry honey, vegetable broth powder, lavender champagne jelly, strawberry lemonade concentrate, and two ice creams (oat & nut and vanilla, rosemary, & black pepper)! Yum!


I have a lot of lovely things to look forward to as summer is starting. I feel like my day planner is already overflowing with things to do!

What made you smile lately?

Jam Sessions : Basics : Termonology

18 June 2013

I have been canning for about 10 years.  When I started, it was just once a year - I would pick strawberries and make one big batch of jam and can it.  This was the recipe and the process that brought be back to childhood...back to the kitchen with my mother and grandmother hoisting me up over the stove to stir the thick pot of strawberry jam as the intoxicating sweet smell filled the room.   When I made jam, it made me feel so connected to that memory and to them.

After awhile. I started to realize that there were so many more things that I could do with that big beautiful canning pot.  I started to experiment with other recipes and I started to find all kinds of new inspiration at the local farmers market.  Canning started to become more than just a connection to a memory, but a connection to food and a connection to eating seasonally.   In recent years, as the popularity of canning has risen, it has also given me a community of wonderful and inspiring people that share my love.  I really want to add you to that community and that is why I am doing this series on my blog.

People tell me often that canning is just too intimidating to try. I know it does seem like a lot of information at first. Remember that it's just like any other new craft or multi-step recipe you've done before - there are just some new terms, techniques and steps that you need to learn, but once you get those down your possibilities become limitless! Over the next few weeks, I will share the basics of canning with you - the terms, the hardware, the process, and the troubleshooting...and of course the amazing recipes you can make!   I really hope that you will get inspired and give it a try!

Let's start with some bare bones basics, shall we?  There are quite a few words that will often come up in any canning recipe and the first step is being able to decode those words.  To help, I created a small dictionary of canning lingo that you might come across.  I also included a handy guide to help show you the common different types of canned goods.  The intent here is not to encourage you to memorize all these words, but rather to give you a point of reference when you need it.


chutney
A combination of vegetables and/or fruits, spices and vinegar cooked for a long period of time to develop favorable flavor and texture. Usually with a sweet-sour flavor.

conserve
A soft spread similar to jam, that is made with at least 2 kinds of fruit in addition to nuts or raisins.

jam
A spread made by crushing or chopping whole fruits. Jams are thicker than jellies and tend to contain chunks of fruits.

jelly
A spread made with only fruit juice rather then the whole fruit to form a smooth gel consistency.

marmalade
A spread that contains pieces of citrus fruit and peel evenly suspended in transparent jelly.

pickle
A perserved fruit or vegetable (usually a cucumber) in a vinegar or brine solution

preserves
A spread in which fruit is cooked with sugar to the point where large chunks of fruit or whole fruit (usually berries) are suspended in a syrup base. The texture of preserves is not as smooth as jelly or jam.

relish
A pickled product prepared using chopped fruits and/or vegetables cooked in a seasoned vinegar solution.

fruit butter
A soft spread made by slowly cooking fruit pulp and sugar to a consistency thick enough to mound on a spoon and spread easily. Spices may be added.

fruit curd
A creamy spread made with sugar, eggs and butter, generally flavored with citrus juice and zest. Curds are often not safe for waterbath canning because of their dairy content, so be sure to use a recipe specifically designed to be canned.


citric acid
A powder made from natural acid derived from citrus fruits. Citric acid is often used in recipes to increase the natural acid in the recipe in order to make it safe for canning. Lemon juice or lime juice may also be used for the same function, but each have their own PH level.

fermentation
A reaction caused by intentional growth of yeast, bacteria, or mold in which natural sugars are turned into lactic acid. Examples of fermented canned foods include sauerkraut, kimchi, and some pickles. Fermentation can also

fingertip-tight
The degree to which screw bands are properly applied to fresh preserving jars. Use your fingers to screw band down until resistance is met, then increase to fingertip-tight. Do not use a utensil or the full force of your hand to over-tighten bands.

full rolling boil
A rapid boil. A boil that can not be stirred down. This boil generally occurs at about 220°F (104°C). This stage is essential for attaining a gel when making jams & jellies

headspace
The unfilled space in the canning jar between the top of the food and the lid. Each recipe will specify the amount of headspace needed. This headspace is needed to allow for expansion when the jars are heated and also to form a strong seal once the jars are cool.

hermetic seal
An absolutely airtight container seal which prevents reentry of air or microorganisms into packaged foods.

high-acid food
A food with a pH level of 4.6 or lower. Most tomatoes & fruits (except figs, Asian pears, melons, bananas, dates, papaya, ripe pineapple, persimmons) are naturally high in acid. Citric acid, lemon juice, or vinegar can sometimes be included in a recipe to help raise the acidity. Fermentation can also add acidity. Only high acid foods are safe for waterbath canning.

low-acid food
A food with a pH level higher than 4.6. Vegetables, meat, & seafood are all low acid foods. These are foods that are easier for bacterica to thrive in and need to be processed in a pressure canner to safely perserve them.

pectin
A natural gelling agent that is derived from fruits like apples or citrus fruits. Pectin can be purchased as a powder that is added to softer fruits like strawberries to create a thick jam or jelly. Pectin is available in several varieties including low-sugar or liqud (more on that in the next post!)

pressure canning
The use of a pressure canner to heat-process low acid foods. The pressurized steam inside the canner allows the food to reach higher temperatures and thus can kill the harmful bacteria that can be housed the the low-acid food. Pressure canned food also must be processed for the specified amount of time on the recipe.

processing time
The time in which the filled jars need to remain in the waterbath or pressure canner. The processing time is specified in most recipes and can have variances depending on your altitude. The amount of processing time depends on many factors including the acidity level, size of jar, and type of food. The process time allows every bit of the jar to be heated to the sufficient temperature.

reprocessing
Repeating the heat processing of filled, capped jars when a lid does not seal within 24 hours. The original lid must be removed and the food and/or liquid reheated as recommended by the recipe. The food and/or liquid must be packed into clean, hot jars and covered with a new, clean lid with the screw band adjusted. The filled jars must then be reprocessed using the preserving method and full length of processing time recommended by the recipe.

spoilage
The evidence that a food product has not been completely rid of microorganisms. If microorganisms are present, the nutrients in the food product will allow them to grow and multiply. Spoilage occurs when food products have not been processed correctly. Signs of spoilage include broken seals, mold, gassiness, cloudiness, spurting liquid, seepage, yeast growth, fermentation, slime and disagreeable odors.

sterilization
The process of killing bacteria. Achieved by heating empty jars to a high temperature prior to filling them & then heating them again once full.

waterbath method / boiling water method
The simplest method to preserve high-acid foods. Using a waterbath canner, water is heated to at least 212°F (100°C) to destroy molds, yeasts, and bacteria & also to seal the jar lids. The jars must be kept in the canner and covered by at least 2" of water for the specified processing time in the recipe. You should not use this method for low acid foods


This list is of course very incomplete, there are limitless possibilities when canning.  This is really just the beginning, so stay tuned for more canning basics, recipes, and even a giveaway!!

Cold Brew Coffee in a Mason Jar!

13 June 2013

The mornings are starting to get warmer and I find myself less and less interested in the usual hot cup of coffee in the morning.  I have been craving a cold caffeinated treat in the morning instead.  Iced coffee is definitely one of my favorite summertime beverages.

And is way easier to make than you think!  It doesn't even require special tools...all you need is a 


You could buy a toddys that is designed specifically for cold brewing & it would run you about $30+, but they really aren't necessary to make an awesome cold brew!  All you need is a french press or a mason jar.

The cold brewing process eliminates about 60% of the acidity in traditional hot coffee, which I am sure my acid reflux will thank me for.  It also makes a nice smooth coffee that tends to be less bitter that a traditional brew.  Another thing I love about this method is that it makes several cups of coffee in one super easy shot and stays fresh in the fridge for up to two weeks.  It's perfect because my coffee is just waiting for me when I wake up with no fuss.  If you are in the mood for hot coffee, you can easily heat it up and enjoy the benefits of the less acidic, smooth brew!

All you need is: 

2/3 cup ground coffee (ideally corse ground)
3 cups cold water
1 teaspoon brown sugar*


Combine all ingredients in a mason jar or french press & give it a shake.


Steep for 12-24 hours on the counter or in the refridgerator


Using cheesecloth, strain out all the coffee grounds and store in the fridge.


This will create a nice strong coffee which I love, but you can also add a bit of water to dilute the strength.  Add your favorite cream and/or sugar and a bit of ice and enjoy!  This recipe makes about 4-6 cups of coffee depending on if you dilute it or not, so stick it in the fridge for a no fuss chilled coffee!


*Brown sugar is totally optional, but I like that it adds a bit of sweetness and depth to the brew!

Balsamic Grilled Strawberry Shortcake! (Sugar-Free & Gluten-Free)

10 June 2013

It seems quite a few people in my life are going through really big dietary restrictions.  Food is one of the ways that I express love, so I really like to challenge myself to get out of my comfort zone and make food that makes other people happy.  This recipe is really a redesign for a classic favorite of mine that I absolutely love during grilling season.  All the tweeks were made for a specific diet in mind, so if you don't have the same needs, you can absolutely make changes to suit your likes!

This is a really lovely take on the classic strawberry shortcake.  The grilled berries just add an extra element of WOW and take the flavors up.  This recipe is gluten-free & sugar-fee and it could easily be made lactose-free with a whipped cream substitute.  There are a couple of parts to this recipe and each of them are a cinch to make!


Coconut Flour Biscuits
1/3 cup coconut flour
5 tablespoons butter or coconut oil, softened
4 eggs
2 tablespoons honey
1/2 teaspoon baking powder
1/4 teaspoon salt
1 tablespoon shredded coconut (optional for texture)

Preheat oven to 400 degrees.  Combine all ingredients using an electric mixer and blend until smooth.  Scoop about 8-10 small balls using your hands or an ice cream scoop.  Pat the top down with your hand to make about 1/2"-3/4" patties.  Bake for 12-15 minutes until golden brown.


Balsamic Grilled Strawberries
1 pint of strawberries, hulled
1/3 cup balsamic vinegar (I used basil balsamic from Blue Heron to add a bit more depth)
1/3 cup honey or agave (or sugar)
wooden skewers

Whisk the balsamic with the honey together and then pour over strawberries.  Cover and store in the fridge for at least 3 hours or overnight.  Soak wooden skewers in water for at least 30 minutes (to avoid having them catch on fire on your grill).  Put the whole marinated strawberries on your skewers - about 4-8 per skewered depending on the size of the berries.  Grill over high heat for about 10 minutes, turning halfway through.

Balsamic Grilled Strawberry Shortcake!  Gluten-free AND Sugar-free!

Once the strawberries are ready, assemble them on top of your biscuits   Top with fresh whipped cream or a non-dairy topping.  You could also just drizzle the whole thing with some extra honey or agave and skip the cream.

This recipe is easy to make and it's the perfect thing to enjoy strawberry season!


Perfectly Portland : Historic Columbia River Hwy & Multnomah Falls

05 June 2013


I was really inspired by Jule's series of "Cute Toronto" & I am often getting asked by traveling friends what they should do in town, so I decided to make my own series this summer of my favorite places in Portland!

I was born and raised on the east coast, but I decided to pick up and move 3,000 miles because I fell in love with this city.   Almost 12 years later, I am still just as in love with this city as the day that I arrived.  I find amazing things here that inspire me daily and I really want to share some of those things with you.

I decided to start with one of my favorite drives - The Historic Columbia River Highway (Route 30).  When I first visited Portland, I had never seen a waterfall and I really had no idea that Oregon had such beautiful natural landscapes in store for me.


The drive takes about 2+ hours from Portland and back.  You could skip the historic highway and take I-84 (also named Columbia River Highway for added confusion) out to the falls in 30 minutes and it is a pretty drive along the river, but I am afraid you would really be missing out.


The HCRH starts in Troutdale.  You can either take NE Halsey straight through Portland or exit 16 - Wood Village on I-84 E.   Troutdale is home to a few darling stops including a Barn Museum, The Harlow House, and the Rail Depot Museum, a small outlet mall, and McMennimins Edgefeild.


McMenamin's Edgefeild is usually my first stop because it is an excellent place to grab a bite, enjoy some delicious local beer, or perhaps take a soak in the soaking pool at Ruby Spa.  The grounds are beautiful and it is a lovely experience to just walk around bit and take in the gorgeous gardens, gift shop, and charming old buildings.  They even have a golf course if you are into that kind of thing.  Of course this stop is optional!


After your stop at Edgefeild, you can continue on the to HCRH to your first beautiful site - The Women's Forum.  The Women's Forum is a beautiful viewpoint for you to catch your first glimpse of the gorgeous Columbia Gorge.


Next, follow the winding road onward on the HCRH and head to the Overlook Vista House.  This beautiful building was built in 1917 as a comfort station for travelers of the HCRH & as a momument to Oregon Pioneers.  It offers more breathtaking views in addition to a free small volunteer-run gallery of  Oregon History. You will also find a public restroom here.


There are 4 small falls on the way to Multnomah Falls including Latourell, Sheppards Dell, Bridal Veil,  & Wahkeena.   Each of these falls are just a short hike from the highway and all of the trails are beautiful and easy to walk.  Look for signs & you will find a few small parking lots.  Most of these stops also have picnic areas and view points to take in all the natural beauty.


Finally, you reach Multnomah Falls.  You can't miss it!  There is a parking lot right in front of the falls.   It's a very easy walk right over to the falls.  You can also hike up to a bridge to get a another view of the falls and the gorge.   The falls are 620 feet high and inclue two gorgeous drops.  It's a breathtaking place to be.

There is a free visitor center where you can learn about the local eco system and ask questions of the friendly and knowledgable volunteers.  A gift shop & snack bar are also available.  Hot dogs not your thing?  Be sure to make a reservation at Multnomah Falls Lodge for a beautiful meal.

After Multnomah Falls, you can hop right on I-84 and head back to Portland.  If you are still craving adventure, continue on the HCRH to check out 3 more small waterfalls, Ainsworth State Park, and the Bonneville Dam.  This route will also take you to Hood River, an adorable little town known for the Hood River Fruit Loop - a fabulous route through many darling farms, fruit stands, and shops.

For more information, maps, and history of the HCRH, check out this fabulous website!  Enjoy your trip!

DIY Plant Markers Tutorial!

03 June 2013

I have been on the hunt for the perfect adorable plant markers that I could customize, but after scouring Pinterest for weeks, I came up short.  I decided to experiment a little with the left over oilcloth from the outdoor bunting I made last week and  came up with these darling little flags!  I absolutely love the pop of color they add to my mostly green veggie beds and they match perfectly with my colorful containers on the deck!  They are also pretty easy to put together and can be customized to your hearts content!


Oilcloth is the ideal medium for this because it is already waterproof, but you could also experiment with other materials like sandwiching pretty paper between the layers of vinyl and adding extra coats of outdoor modge podge to get a good seal.  Another option would just be to paint directly on the oilcloth with a nice heavy duty acrylic paint, but I can't paint to save my life, hence the printer is my BFF.

Here's what you need to get started :
1/8 yard thick clear vinyl*
patterned paper or oil cloth
a printer or letter stamps
outdoor mod podge
E6000 (or another strong waterproof glue)
6" skewers (or any other kind of dowel or even popsicle sticks)
binder clips
scissors
foam brush

*This is available at your local craft store - usually in large rolls. You can also buy it online. I used a 30 gauge because it was the thickest one available at my store.
1. Start by creating the text for your markers.  I printed a list of the things I was growing on basic white printer paper, but you could handwrite or use cute letter stamps.  Cut eat one into the shape you'd like.  I went with these cute little banner shapes by making a rectangle and then just cutting a little triangle off each end.  Each strip is about 1/2" tall.

2. Using your mod podge, glue down the paper to the oil cloth.  Make sure you have enough room (at least 1 1/2") on the left to wrap around the stick and then an extra 1/2"-1" on the right to cut you triangle for the flag. Also be sure to space them at least 1/2" or more so that you can cut the strips.  Add a layer on top to get a good seal.  Let this dry.

3. Cut your strips out of the oil cloth.  I left about 1/4" on the top and bottom, but you can leave as much room as you like.  You can also do this step with a paper cutter or a straight edge with a rotary cutter if you want to be precise, but I just did it free hand with the scissors and shaped as I went.
Overlay your clear vinyl and cut it into a strip that matches shape of the oil cloth.  Coat the vinyl in mod podge and lay it on top of your oil cloth.  Let it dry for about 30 minutes to an hour.  Don't worry about the white streaks, it will dry clear!  Once the mod podge is dry (it will no longer slip around on top of the oil cloth).  You can cut your triangle off the end.

4. Seal the edges with a coat of mod podge.  This will ensure that water can't get in between your oil cloth and vinyl to protect the paper inside.  Just use a foam brush and rub it along the edge. Since the mod podge dries clear, don't worry if it gets on the front vinyl, you can just coat the whole thing if you want.  Let dry.  Add one more coat around the edges.

5. The last step is attaching your sticks.  To do this, just turn it over add your E6000 to the flat edge.  Use the non-pointy end of your skewer to spread the glue and be sure the stick is nicely coated.  Wrap around the stick.  Once it's tightly wrapped and in place, use a binder clip to hold it in place.  Let dry.

Add to your plants and enjoy!


You can also experiment with different shapes!  This heart was made with the same process, I just used a large heart punch and added one more layer of the clear vinyl to the back side to make sure the stick was held tightly in place.  I love this shape because I can add notes like planting dates!


Happy gardening!

Mailbox Love : Cara Box & a Postcard for You!

I am a little late on this reveal!  This month I participated in the Cara Box Swap.  I have always been really in love with the art snail mail.  When I was young, I used to exchange friendship books and slams and I had pen pals that I would write letters to on my Lisa Frank stationary and it is a love that has held on and evolved with me through the years.  It's just really amazing how a little piece of mail can brighten your day.  Plus, I really love to put together cute themed gifts & connect with other bloggers, so I was stoked to participate!

The theme this month was "regional" - showing off where you are from.  I was lucky enough to be paired up with two amazing bloggers.

I send a Portland themed package to Kodie.  I filled it with some handmade gifts form Crafty Wonderland, hazelnut coffee, locally made dog treats for her pup, and a copy of Hipter Puppies.  Her blog is lovely and honest, so you should check it out!

My other partner was Allison.  Her blog is called Nestful of Love and it is full of adorable positivity, cute outfits, and domestic inspiration!  Go check her out!  She really went out of her way to make something really special for me and it absolutely blew me away and made my day (seriously, I teared up a little when I went through it because it was so thoughtful!).


Allison is from Ohio, so her package was a little introduction to her state (which I have driven through once, but never spent any time in, so I was excited to learn about it!).  She saw in my bio that I collect manatees, so she went out of her way to go to the zoo and pick up these awesome manatee trinkets (Look at that teeny tiny manatee! Does it get any cuter?!).  I had no idea that Cincinnati had such a great manatee exhibit...it is an excellent reason for me to put it on my list of places to visit!  She also included cute colorful cat notecards from a local artist, a honey bear & lavender soaps from local farms (she couldn't have possibly known this, but those are both two of my favorite things!), french chew candies, and Skyline Chili!  She even gave me a recipe for her Skyline Chili dip and I can't wait to try it!  

This was seriously an amazing gift and it absolutely made my day!  Thank you so much Allison!  


I was really inspired by how happy this mail made me & also today's post from Melyssa at the Nectar Collective where she offered to send readers a postcard from Japan.  I would love to do the same for you guys!  If your mailbox could use a little brightening up, send me an email with your address by the end of the week and I will send you a postcard! <3
 
Blogging tips