Havest Time!

05 September 2010

Well, it was a weird summer in Portland to decide to try out gardening. The summer was very mild and it certainly took it's time getting here. Many farms in the area also fell victim to this weird weather pattern and late coming of summer and our typical bountiful northwest produce has been slowed and been a little inconsistent.

Picture 444
My side garden - zuchinni, squash, peppers, and 4 tomato plants. I also have a salad garden - cucumbers, cherry tomato, bannanna pepper, greens, and eggplant in front.

I'm still pleased as punch for the little bit of harvesting I've been able to to do! I've always been loved making recipes with local produce, but there is something so special and wonderful about picking it straight from your front yard and creating a nurishing meal. Overall, my first year as a gardener was a success! I learned quite a bit along the way (mostly about spacing...when the little tag says 2 feet between the plants, it means it) and I'm already dreaming of how I will improve my garden next year.

IMG_0041
This is my first little tomato harvest. It was made into a savory tomato-basil jam - details coming tomorrow! Stay tuned!

Fig Jam

14 July 2010

I am in love...with a sandwich. It's a very simple sandwich, but it rocks my world. Bagette + goat cheese + ham + fig jam = absolute perfection. I have not had an easy time finding said fig jam in the grocery store, so I was so excited to see fresh figs at the farm this weekend! I made a tiny batch to start and I cannot wait for fig season to be in full swing over the next few weeks so I can stock up.

IMG_0920

Figs are a little fruit that I have not had the good fortune to be able to experience much in my life and now that I have found them, I don't ever want to live without them. They are also just so beautiful. The color inside is so perfect.

5 cups chopped figs (about 2 dozen large figs) - stem and ends removed
1 1/4 package of low sugar pectin
3 cups sugar
1/4 cup lemon juice

You may want to peel your figs for astetics, but I think that is far more fuss than it's worth. Throw your figs into a large pot and mash up a bit with a potato masher. Add your pectin (mixed with 1/2 cup sugar) and bring them to a hard boil (one that cannot be stirred away). Once you are at a good boil, whisk in the rest of the sugar. You can add an extra cup of sugar if you want a sweeter jam - this recipe is really for a more subtle and less sweet blend that I can use in savory things. Bring back to a boil and let boil for one solid minute. Remove from heat. Check for jell with that handy spoon trick I told you about yesterday. Once you have the right consistency, fill up your jars and give them a good 10 minute process in the hot water bath.

Start making yourself some delicious sandwiches or serve with cheese and crackers at your next party!

Lavender-Peach Jam

13 July 2010

Lavender adds such a unique floral sweetness to any dish you put it in and it is just lovely to look at. There is a cute little lavender farm just outside of Portland where I was able to pick a big bunch of lovely purple buds fresh from the feild.

I decided that peaches would be the perfect partner for lavender because they are so sweet, clean, and mild. The flavors in the jam mix perfectly. I like the strong floral umpf that the flowers offer, so I was a little heavy handed with it - but if you are a little shy on florals you can just use tea without adding the buds.

IMG_0898

The first step is to make a lavender "tea". Mix 1/2 cup of hot water with 2 tablespoons of lavender buds. Mix over high heat until the mix comes to a boil. Take off the heat and leave to cool completely (30+ minutes). Then drain out the buds to collect a lovely fragrant purple tea.

IMG_0908

Next, start work on your peaches. You will want to remove the skins because they can be bitter and chewy. The easiest way to peel peaches is to put them into boiling water for 30 seconds, then drop them into an ice water bath. The skin will rub right off. Once the skin is off, you can dice your peaches and put them into a large pot. Mash your peaches down a bit with a potato masher and turn the heat to medium-high. Add your lemon juice, lavender tea, and buds.

The amount of sugar that you need will depend on which type of pectin you use, so be sure to check that little handy guide that comes inside your pectin box. This recipe is based on using a low sugar pectin formula. The low sugar pectin is always my go-to becuase it produces a solid jell with a sweet flavor without being completely overwhelmed with sugar. It also is availabe just as readily as the traditional high sugar kind. If you are using a regular pectin, you will probably need about 8 cups of sugar.

Take 1/4 cup sugar and stir it into the package of powdered pectin. This will help the pectin to not clump up. Add to the peach mixture and stir well. Bring to a rolling boil - one that you are not able to stir away. Once you are at a good soild boil, add the rest of the sugar and stir. Bring back up to that strong boil and let boil for exactly one minute. Remove from the heat.

To check your jam for consistency, I like to keep a metal spoon in icewater ready. Scoop a bit of the jam and let it cool completely (the freezer can help with that). Once the jam cools, you can make sure it is the jelly consistency that you like. If it is too runny, you can add more pectin and boil for one more minute.

Once you are at the right consistency, you can start filling your jars! Process for 10 minutes in a hot water bath. You can also make this a freezer jam or just make a small batch to enjoy that week (don't worry, it won't last long!) if you don't want to fuss with the canning process.

IMG_0953

This jam would make an excellent sweet marinade on meat or just a perfect element for your toast!

Jam Week!

11 July 2010

One of my very favorite childhood memories is of making jam. When I was a little girl, my mother and grandmother would take me to pick strawberries in the feilds of Styer Orchards and then we would make huge batches of strawberry jam. That vivid memory of perfect summer days, the sweet smell of cooking berries, and 3 generations together in the kitchen is really what motivated me to learn to make jams on my own. There is something really wonderful and special about connecting to the past and traditions in the form of food.

The process of canning may seem a little intimadating, but it has come a long way since my gradmother's kitchen and it just takes a little practice to master.

The best online resource for any begining jam maker is definitely pickyourown.org...they offer a comprensive step by step guide (with photo of each step) for most basic recipes. They also sell supplies.

Speaking of supplies, in order to start canning, you will need a few basic items. I suggest you start with the essensials at first and then you can add more specialized items to your arsenal from there...

The first thing you need is a canning pot (or "canner") - you can find them online or at most major stores (I've seen them at Fred Meyer & Walmart) for about $25, but I see them constantly at thrift stores and estate sales for a couple of dollars - so it is probably worth keeping an eye out. The canning pots should come with with a wire rack that fits into the bottom to keep your jars from banging together and keep direct heat off the bottom of the jar.

You also need to select the size and style of jars you want to use. When it comes to jam, I prefer half-pint and 4oz jars. The jam will last for 1 year in the cabinet, but once your jam is opened it has a more limited life in the fridge, so I just think the smaller jars are more practical. I also like that I can make more jars to share with friends. Larger full pint and quart jars are perfect for sauces and veggie canning. You can reuse your jars and the rings year after year as long as you are careful to inspect them for chips or fractures before using. The top lid piece of the jars is the only part that will need to be replaced with each use (it has a rubber gum that assists in the sealing process).

Other tools you need to get started: a nice big pot to make your jam, ladle, and tongs or a jar lifter. Jar lifter tool is really a wonderful thing to own if you are doing any kind of canning. You can use tongs to get the jars out, but the jar lifter will save you a lot of aggrivation and will be well worth the 5 bucks.

Once you get all the basics down, you are ready to start making jam!

This summer, I am working on some non-traditional jams. I will be posting a new recipe each day this week! Welcome to Jam Week!

A simple vertical garden!

20 June 2010

I recently moved into great cute little pink house and it is slowly, but surely starting to feel a lot like home. After living in several duplexes, it is really nice to have a real house with a yard and deck to ourselves. This is the first time I've felt like I really had the space to tackle making a real garden, so I am really excited about that! I've spent a lot of time learning, digging, and shopping for plants lately.

One of my favorite parts of my outdoor space is our vertical herb garden. It is a fantastic space saver and adds a fun element decoration to the patio. It was also really inexpensive to create!

IMG_0536

The side of our patio has a metal grate that I really wanted to be able to utilize in some way and dress up just a bit. I had bought some Bygel containers from Ikea to store pens in my craftroom, but I realized that they might actually be exactly what I needed for the patio! The Bygel containers fit perfectly onto the metal grates and they already have 3 holes drilled in the bottom, so they drain well and are perfect for plants! And for 99cents each, this project is super simple and fits any tiny budget! I imagine most people aren't lucky enough to have this grate system in their backyard, but these Ikea gems could be also be used with these rails (as they are in my craft room), fences, or maybe a nice heavy trellis of some kind? You could definitely set this vertical garden up indoors near a window, but just keep in mind that you would need a system to catch the water that drains from your plants.

IMG_0538

I have always been really unsuccessful with plants in the past (I always thought I had a "black thumb"), so I am extra delighted that all of my plants seem pretty happy and are growing well! We currently have about 10 types of herbs growing right outside our kitchen door and it has been so wonderful to be able to easily add some freshness into my dishes. I am looking forward to a summer full of trying some new herb recipes.

I also dug a few various small beds for planting veggies. I have about 30 various varieties of vegetables growing around the yard and so far they are mostly all doing quite well! My tomato, peppers, and squash have already started to flower and we are getting harvests of spinach and lettuce any time we need it. The strawberries are slowly, but surely turning from green to juicy red. I am really excited to be growing my own food...it's so empowering and I am surprising myself with how easily I am able to it! I am so excited for summer when my plants start to produce and I can try out some new recipes!

garden
(these photos were taken a couple of weeks ago, and there is already a lot of growth since then)

Oh, hello!!

14 June 2010

This blog is so neglected, but I miss it. I am going to be better about updating. I know I've said that before, but I mean it! I just moved into a cute new PINK house and settled into a new job and now after a few months of chaos, I am setting into domestic bliss and I can't wait to share it!

Stay tuned!!

Soft pretzels in 5 easy steps!

14 March 2010

I love Portland and it is my home now, but the truth is - down in the core of me is an east coast girl. My heart still belongs to east coast cuisine.

Philadelphians eat an average of 20 pounds of pretzels per year per person (the american average is 2 pounds per person) and you can find them for sale on just about every corner or convenience store in the Philadelphia metro area. Clearly pretzels were a staple of my adolescence and I miss them. No, I crave them.

I decided this weekend, it was time to bring my childhood into my kitchen. I have to be honest, I was pretty intimidated by the process involved with making pretzels from scratch - the rising yeast and the boiling mostly - but I have to say that I am pleasantly surprised by how easy they were to make! If I can do it, I have faith that just about anyone can.

005

Here is the soft pretzel process broken down in a very easy way. 5 simple steps, that is all!

Here is what you need:
1 1/2 cups warm (110 to 115 degrees F) water
1 tablespoon sugar
2 teaspoons kosher salt
1 package active dry yeast
4 1/2 cups all-purpose flour
2 tablespoons unsalted butter, melted
Vegetable oil, for pan
10 cups water
2/3 cup baking soda
1 large egg yolk beaten with 1 tablespoon water
Pretzel salt

Step 1 - Make the dough. Combine warm water, salt, sugar, and yeast. Allow to sit for 5 minutes until the yeast starts to foam a bit. Add the flour and butter. Combine and knead for about 3-5 minutes. If you have a kitchenaid mixer, you can use your dough hook attachment and mix on medium speed or you can do it by hand.

Step 2 - Let it rise. Oil your bowl and cover with a kitchen towel. Leave the dough in a warm place for about an hour to rise.

Step 3 - Roll it out. Cut the dough into 8 equal pieces. Roll each piece into a long rope and twist together into a pretzel shape. You don't have to actually make a traditional pretzel, you can shape them any way you'd like. I made half the dough into pretzels and the other half into buns. Place the pretzels on pans lined with parchment paper with a brush of oil.

Step 4 - Boil. In a big pot, combine 10 cups of water with 2/3 cup baking soda and bring to a boil. Place each pretzel into the pot, one by one, and cook for 30 seconds. Remove from the water with a large flat spatula (if you try to use tongs, it will mess up your pretty shape) and place back on the parchment paper. This step and the baking soda is nessisary to change the PH levels in the pretzel and give them that shiney golden brown color we all love so much.

Step 5 - Bake it. Mix 1 tablespoon of water with one egg yolk to create an eggwash. Brush each one with the wash and sprinkle with pretzel salt.* Bake at 450 degrees for 12-14 minutes until you get a nice golden brown color. Place on a cooling rack for at least 5 minutes.


*I could not find pretzel salt at our grocery store so I used sea salt...which was fine, it gave it a nice salty taste, but I do wish I had the real thing. It makes a difference. If you plan ahead, you can pick some up on amazon for $1.59/lb.

009

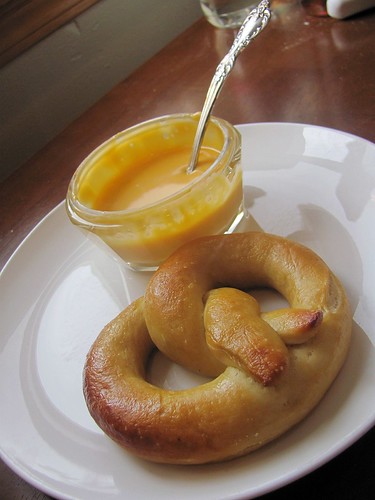
I should mention that when I told my coworkers of my planned pretzel adventures, several of them asked me if I would also be making a fancy mustard dipping sauce. NO. I certainly will not be making a fancy sauce. I am from Philly dudes, I got myself a jar of CHEESE WHIZ for the side! Seriously, if you want an authentic Philadelphia experience, you should try it. Don't knock it till you try it.

013

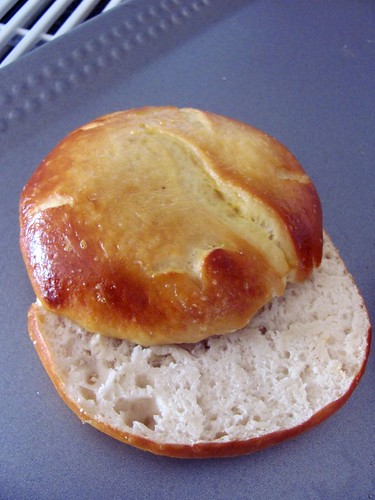
Also, while I was pondering this whole plan, I was also reminded on one of my favorite sandwiches. Mike's Drive In is a cute little burger joint in the Sellwood neighborhoood that features sandwiches on pretzel rolls and there is just something about those buns that just elevates the simple sandwich to a whole new place of amazing for me, so I decided to make a few pretzel rolls at home. Instead of rolling and shaping 3 of my dough pieces, I simply rolled them into a slightly flattened ball. I can't wait to make these into sandwiches for lunch this week!
 
Blogging tips