Showing posts with label baking. Show all posts

veggie empanadas!

04 May 2009

a few weeks ago, my coworker brought these little gems in for a potluck and i knew i needed to make them again. there was never really an official "recipe" for this so i did my best to document it as i made it...

IMG_7838

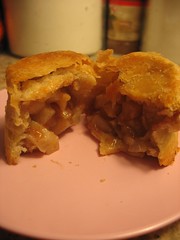
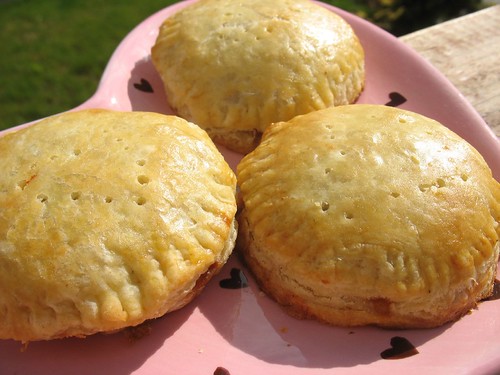
vegetarian empanadas!

1 package of puff pastry (available in the freezer section)
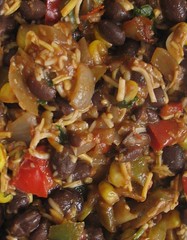
1 tablespoon vegetable oil
1/4 cup chopped onions
2 cloves minced garlic
1/2 cup chopped peppers (i used a combination of green, red, and a bit of serrano)
1/4 cup corn
1/4 cup cilantro
1 can black beans
1/4 cup of salsa or enchilada sauce
1 tablespoon cumin
1 teaspoon chili powder
1 teaspoon oregano
1/2 cup shredded cheese

IMG_7859

preheat oven to 400 degrees.
heat oil in a large skillet. add onions, garlic, and peppers and saute for about 5 minutes until onions are translucent. add corn, salsa, cilantro, and dry spices and simmer on low for about 5 more minutes. allow mixture to cool. add the cheese once the mix is cooled (basically you want to let the cheese melt in the oven instead of in the pan).
follow directions on the puff pastry box to thaw (probably about 40 minutes on the counter). once the pastry is thawed, roll it out on a floured surface to about 1/8". use a cookie cutter or a glass to cut little circles out of both sheets of puff pastry. add about a tablespoon of the filling to the center of each circle. rub a bit of water around the inner edges to help the sides stick and press with a fork around the edge to seal. prick the top a few times with a fork or toothpick to vent.
place the empanadas on a non-stick baking sheet and brush with egg wash (1 egg mixed with about a tablespoon of water). bake for about 10-20 minutes until brown.
makes about 9 small circle empanadas.

these came or really tasty and they were also adorable. next time i would make the pastry from scratch (though they may not be as flaky and puffy) , but i was making these for a friend's birthday party and i just wasn't feeling like all the fuss of making pastry dough too. shortcuts can be wonderful & yummy friends.

vegan peach cupcakes with mango frosting

24 April 2009

i purposefully used an almost identical recipe for the mango cupcakes for simplicity sake. you can easily whip up a double batch of unflavored batter and then seperate add the diffrent purees into the mix. i loved that these came out with a really strong, not too sweet mango taste.

IMG_7801


vegan peach cupcakes
1 tablespoon apple cider vinegar (don't worry about the smell, it bakes off)
1 cup of soymilk (flavored if you want...i used vanilla)
2 3/4 cups flour
2 teaspoons baking powder
1/2 teaspoon baking soda
1/2 teaspoon salt
1 cup sugar
1/2 cup oil
1 teaspoon vanilla extract
1/3 cup peach nectar
1/2 cup peach puree (i just used canned because it is not peach season)

preheat the oven to 350ºF.
put the cider vinegar into a small bowl and add the soymilk. whisk well. the mixture will start to thicken up or curdle (i know that sounds weird and gross and i was nervous, but trust me, this will work!)
stir together the flour, sugar, baking powder & soda and salt.
mix the oil, peach nectar, and vanilla extract into the bowl containing the soymilk and vinegar and then slowly add the wet ingredients to the dry ingredients and blend.
add peach puree and continue to blend.
scoop into cupcake wrappers. these will puff up a lot...more than most of the non-vegan cupcakes i make do. past vegan recipes i've made have ended up pretty flat, so as a caution i filled the wrappers almost to the top and got a really puffy dome top...so depending on what you are going for about 3/4 full is great.
bake for 20 - 25 minutes until starting to brown.


vegan mango frosting

1 cup (2 stick) vegan butter - room temperature
2-3 cups powdered sugar
puree of two fresh ripe mangos

bring cream cheese and butter to room temperature and beat together until creamy. add the mango puree.
add powdered sugar, 1 cup at a time, until desired sweetness and texture.
again, the puree will effect your ability to get a really stiff frosting, but i really think that nice strong mango flavor that came from using two mangos was worth a kind of goopey frosting.

my coworkers seemed to really love these as well as the strawberry ones. i think the key to this was using fresh mango, ripe in the frosting. you could try it with canned or frozen, but i cannot promise the same effect and delicious-ness.

vegan strawberry cupcakes and strawberry buttercream frosting

23 April 2009

i really just wanted to go for the whole orange and pink work color scheme for the cupcakes i was making, so the logical choice to me for pink was strawberry since i have been dying to try my hand at strawberry buttercream. two of my coworkers are vegan. i am not a very good vegan baker, but i am working on it. it's important to me that if i am going to make something for work, hopefully it is something everyone will have the opportunity to enjoy. so, this is more adventures in vegan baking...

IMG_7795

the first step before you do anything else is to cop up a pint of strawberries (about 8oz) and add about 3/4 cup of sugar to them. let them sit in the fridge mixed into the sugar for at least 20 minutes (overnight is good too) so then can absorb the sugars and make a strawberry simple syrup. then mash them by hand or throw them into a blender. you will then use this puree for both the cake and the frosting.

vegan strawberry cupcakes
1 tablespoon apple cider vinegar (don't worry about the smell, it bakes off)
1 cup of soymilk (flavored if you want...i used vanilla)
2 3/4 cups flour
2 teaspoons baking powder
1/2 teaspoon baking soda
1/2 teaspoon salt
1 cup sugar
1/2 cup oil
1 teaspoon vanilla extract
1/3 cup strawberry nectar
1/2 cup mashed strawberries

preheat the oven to 350ºF.
put the cider vinegar into a small bowl and add the soymilk. whisk well. the mixture will start to thicken up or curdle (i know that sounds weird and gross and i was nervous, but trust me, this will work!)
stir together the flour, sugar, baking powder & soda and salt.
mix the oil, strawberry nectar, and vanilla extract into the bowl containing the soymilk and vinegar and then slowly add the wet ingredients to the dry ingredients and blend.
add strawberry puree and continue to blend.
scoop into cupcake wrappers. these will puff up a lot...more than most of the non-vegan cupcakes i make do. past vegan recipes i've made have ended up pretty flat, so as a caution i filled the wrappers almost to the top and got a really puffy dome top...so depending on what you are going for about 3/4 full is great.
bake for 20 - 25 minutes until starting to brown.


vegan strawberry frosting

1/2 cup (1 stick) vegan butter - room temperature
6 oz softened vegan cream cheese
2-3 cups powdered sugar

bring cream cheese and butter to room temperature and beat together until creamy. add 1/2 cup strawberry puree.
add powdered sugar, 1 cup at a time, until desired sweetness and texture.
you may want to add more puree to get a stronger flavor. i ended up using at least a cup i think, but it made for less firm frosting, so if you are concerned with having the frosting be able to be piped on, you may want to go easy on the puree. if you want to thin things out, just use some of the strawberry nectar. if you do not care to make this vegan, just use real butter and cream cheese...the effect is the same.


i was really happy with the results! i am not going to tell you that i think my vegan cupcakes are 100% as good as my cupcakes with egg and all the things i am used to using...there is definitely a different texture involved, but i think these were pretty darn good. i will absolutely make some version of the strawberry cupcake again in the next few months once it is officially strawberry season!

ooooh my darlin clementine..vegan cake!

18 March 2009

last week, i realized that my big wonderful bag of clementines (left over from the clementine cupcakes last week) were getting a little shriveled and i was just not going to be able to eat them fast enough to safe them. then i remembered that i saw a recipe on the vegan yumyum blog about candying clementines and a clementine cake, so i got to work!


step one was candying the clementines...
IMG_7366
when you candy citrus, it makes the peel and rind completely edible. i had about 8 or 9 good clementines left, so i pierced them 8-10 times and added them to about 3 1/2 cups of sugar and 2 3/4 cup of water in a big pot and let them simmer for about an hour (according to lolo, you can simmer these for 1-2 hours, but the longer you simmer - the more bitter they will be).

IMG_7375

i was hoping to get a nice sweet candied clementine out of this process that i could maybe eat up with some cream fraise or something, but mine turned out quite bitter after an hour and i am not sure that i could deal with the idea of eating them just as they were. it might have been some mistake i made along the way, but after i drained the clementines out, i did end up with clementines with edible peel that were great to blend up for the cake and also some wonderful clementine flavored simple syrup for drinks and desserts in the future (make sure you save that part!).

IMG_7380

next, i started making the cake. i blended up the drained clementines with my emulsion blender to get about 1 1/2 cup of puree and added it to: 1/2 cup vegetable oil - 1 1/4 cup soymilk, or other non-dairy milk - 1/4 cup sugar - 2 cups all-purpose flour - 1 1/2 tsp baking powder - 2 tsp baking soda - 1/2 tsp salt. and i baked it for about 45 minutes on 350.

i also attempted the fondant on lolo's site, but i failed and it became more of glaze...which was less pretty, but very yummy. really, you just need to make sure you look at the vegan yum yum site because her photos are a million times more elegant than mine and she has a lot more detail on the process which is really helpful.

after all was said and done, there were some things that didn't work out just right, but it made a really good vegan cake with a nice balance of savory and sweetness. i brought the cake to work and my coworkers all were really into it and i got a ton of compliments, so i will call it a success.

coconut lime cupcakes!

yesterday was st. patrick's day. i guess don't feel any great attachment to the holiday because i feel no great attachment to its catholic roots or history and i'm not irish (as far as i know). but in case you are really into the whole green st patty's day thing, i have something green for you!

these were actually something we made up this weekend completely unrelated to st patrick's day. my friend, heather, was feeling really down this weekend, so we decided there was no better solution for that than to bake up some yummy cupcakes!

we actually made 2 types, but i will post the other in a bit.

IMG_7442

lime cupcakes!
makes about 12 cupcakes

1/2 cup (1 stick) unsalted butter, room temperature
1/2 cup sugar
2 large eggs
1 1/2 cups all-purpose flour
1 teaspoon baking powder
1/8 teaspoon salt
1/2 cup milk
1 teaspoon vanilla
zest of 1 lime
juice of 1+ lime
handful of shredded coconut (optional)

beat butter on high until soft, about 30 seconds.
add sugar. beat on medium-high until light and fluffy, about 3 minutes.
add eggs one at a time, beat for 30 seconds between each.
whisk together flour, baking powder, and salt and add to the mixture. add the milk and vanilla. mix to combine.
add the zest and the lime juice. we wanted to get a really tart cupcake with a really distinct lime flavor, so we probably used about the juice of 2 limes, but one lime is good for a more mild flavor.
scoop into cupcake papers about half to two-thirds full (depending on whether you want flat or domed cupcakes).
at this point, heather threw in a handful of shredded coconut to add texture and flavor, but that is optional. i personally didn't like that texture, but a lot of people loved it.
bake for 22-25 minutes until a knife or toothpick comes out clean.

coconut frosting!

1/2 cup (1 stick) butter - room temperature
6 oz softened cream cheese
1 teaspoon coconut extract
2-3 tablespoons coconut milk or coconut cream
2-3 cups powdered sugar

bring cheese and butter to room temperature and beat together until creamy.
add coconut milk and extract and continue to mix.
add powdered sugar, 1 cup at a time, until desired sweetness and texture.
the coconut milk makes this really wonderfully light and fluffy if you allow it to beat for an addition few minutes. if you would prefer a more thick piping consistency, you only need to beat this up until fully combined.

this is seriously the best coconut frosting i have ever made. it was light and fluffy and had really great taste to it and was not at all too sweet. i am kind of adverse to too much sweet in a cupcake frosting...which might explain why just about all the frostings i make are cream cheese based. i think cream cheese is a good balancer. i am considering adding the left over coconut frosting to some lemon crepes later this week even. stay tuned.

we topped the cupcakes with some shredded coconut that i died green to give it a spring-y look. how do you dye coconut? well you put regular shredded coconut in a jar or tupperware with a couple of drops of liquid food coloring and just shake the heck out of it until the color disperses through the coconut. easy peasy.

my love of mason jars continues...in pie form!

09 March 2009

IMG_7334

so, you know how i made that post about how much i love mason jars? well, on my list of all the amazing things to do with mason jars, i had almost forgotten that i saw the post on not martha about these tiny jar pies about a year ago, but they had quickly fallen to the bottom of a busy to do list...and then a post from little birdie secrets reignited my obsession and i just had to make these!

i had a bunch of 8oz jars and 4oz jars left over from summer jams, so this was a great way to put them to work. i found that the tiny 4oz jars were actually perfect for a cute little hand held portion of pie, but my boyfriend, bryan, thought they were too small to consider a portion...we can both agree a portion size depends on the person i suppose.


i used a basic pie crust recipe:
2 1/2 cups all purpose flour
1 cup (2 sticks) of cold butter
1 tablespoon of sugar
1 teaspoon salt
about 3/4 cup cold water

making a good pie crust is not that difficult, but it can be time consuming and it is all about technique, i found this tutorial at smitten kitchen incredibly useful for this part!

then, once you have your crust ready and it has had time to chill roll out the dough to about 1/4 inch or so. i found that there was not a really great technique to lining the jars, so you can just carefully grab a section and shove it in and just do some pressing along the sides.

IMG_7305

i made 3 different fillings just to try some things out. i made a really basic traditional pear and apple sweet pie filling. i also wanted to experiment with simple dinners, so i also made a really easy (aka lazy) vegatarian chicken potpie (which was basically some frozen mixed veggies, sauteed onion, faux chicken strips, cream of mushroom soup, and some rosemary and spices of your choice) which i plan to heat up again tonight for dinner.

i would recommend not over filling them because even though they are tiny, they sure will bubble up, so next time i would make sure there is a bit of extra space for the filling to bubble up and move a bit without a volcanic erruption.

IMG_7323

i put them on a silpad to keep them from moving around when taking them out of the oven (i would say this is a pretty crutial step so you don't end up with an oven coated in pie filling) and baked them for about an hour at 400 degrees. the nice thing about little clear jars is that is it very easy to see when your pies are actually done when they reach that nice golden brown color, so just keep checking on them. the 8 oz ones took a bit longer than the 4oz jars.

IMG_7356 IMG_7338

the wonderful thing about these is that you can keep them frozen and just take them out for homemade pie on demand. they also would make absolutely wondeful gifts either all baked up or frozen with instructions on baking.

IMG_7350 IMG_7352
the pies are easy to pop out of the jar by just slipping a knife down the side and a bit of tapping, but i also think they would be just fine eaten right out of the jar!

pie in jars is just the begining. i am now a bit addicted and cannot wait to try out little cupcakes in a jar or other fun desserts and things. my world has been rocked a little by the idea of cooking in jars. yeah, i am that much of a nerd.

honey cupcakes

08 March 2009

when i made the plan to make the bubble tea cupcakes, it occurred to me that not everyone at the party might be such an adventurous fan of the bubble tea so i wanted make half the cupcakes a more basic flavor, but still exciting and somehow matching the bubble tea theme. i decided to see what i might be able to do with honey because it seemed like the perfect accompaniment for green tea!

it turns out honey cupcakes are simple and amazing! i don't know why it never occurred to me to do more baking with honey before! the honey just adds a bit of sweetness and flavor that i think worked out wonderfully in cupcake form. next time i might try to up the vanilla flavor with some vanilla bean.

IMG_7254

this is a really easy cupcake to make, so have no fear even if you don't bake very often! it is certain to impress a crowd!

honey cupcakes!
makes about 12 cupcakes

1/2 cup (1 stick) unsalted butter, room temperature
1/2 cup sugar
1/2 cup honey
2 large eggs
1 1/2 cups all-purpose flour
1 teaspoon baking powder
1/8 teaspoon salt
1/2 cup milk
1 teaspoon vanilla

beat butter on high until soft, about 30 seconds.
add sugar and honey. Beat on medium-high until light and fluffy, about 3 minutes.
add eggs one at a time, beat for 30 seconds between each.
whisk together flour, baking powder, and salt in a bowl. Add to mixer bowl. Add the milk and vanilla. mix to combine.
scoop into cupcake papers about half to two-thirds full (depending on whether you want flat or domed cupcakes).
bake for 22-25 minutes until a knife or toothpick comes out clean.


honey cream cheese frosting

1/2 cup butter
1/2 cup cream cheese
2 tbs honey
2-3 cups powdered sugar

bring cheese and butter to room temperature and beat together until creamy.
add honey and continue to mix.
add powdered sugar, 1 cup at a time, until desired spreading consistency.

IMG_7265

bubble tea cupcakes

one of my dearest friends, jenny, was having a brunch birthday party yesterday and i was in charge of the cupcakes (because a birthday without cake is just wrong). i debated for awhile about what kind of cupcake to make...do i make a classic and decorate like wild? or do i make a fun exciting flavor that might be less about aesthetics? i decided to go for the second option.

jenny loves bubble tea, so i decided to go with that and see what i could come up with. i decided on a green tea cupcake with a tapioca green tea frosting.

after i made this choice, i needed to go on a wild hunt to find green tea powder (matcha) of some sort. after trying 3 other stores around town, the 4th was the charm...i finally found a small jar of organic powdered green tea from the food co-op on alberta street. i want to say that in this recipe, the green tea powder defies all of my rules of thriftiness because it costs $11 for a tiny little jar, but it was worth it for a friend's birthday. if you're interested in trying this recipe out, you might want to plan ahead and buy matcha online.

that being said, the cupcakes were sort of weird and different, but they were a big hit at the party! i think they turned out really well and were not very complicated to put together. definitely worth trying if you are a fan of bubble tea or sweet green tea! on with the recipe...

IMG_7253

green tea cupcakes
makes about 12 cupcakes

1/2 cup (1 stick) unsalted butter, room temperature
1 cups sugar
2 large eggs
1 1/2 cups all-purpose flour
1 teaspoon baking powder
1/8 teaspoon salt
1/2 cup milk
1 teaspoon vanilla
1 teaspoon (+ or -) green tea powder (matcha)

beat butter on high until soft, about 30 seconds.
add sugar. Beat on medium-high until light and fluffy, about 3 minutes.
add eggs one at a time, beat for 30 seconds between each.
whisk together flour, baking powder, and salt in a bowl. Add to mixer bowl. Add the milk and vanilla. mix to combine.
add green tea, all powders are of different strengths so i suggest adding smaller scoops at a time until you get the desired flavor. if you add too much, i imagine it could make your batter taste bitter. my powder was not very strong, so i ended up using a teaspoon or more. also, keep in mind you are making a green tea icing, so you might want keep the cupcake a little more subtle for balance.
scoop into cupcake papers about half to two-thirds full (depending on whether you want flat or domed cupcakes).
bake for 22-25 minutes until a knife or toothpick comes out clean.


bubble tea frosting
8 ounces cream cheese
1/2 stick butter
2-3 cups sifted powdered sugar
1+ teaspoon matcha green tea powder (see the above note on matcha)
1 teaspoon vanilla
2 tablespoons small dry instant tapioca (i just used the kraft brand, you can find this in any grocery store with the instant puddings)
4 tablespoons milk


in a small saucepan, combine the dry tapioca with the milk and bring to a quick boil. remove from heat and let stand for about 5 minutes until tapioca is softened (it will look sticky, but don't worry it will separate when added to the mix). set aside.
bring cheese and butter to room temperature and beat together until creamy.
add half of the sugar, the green tea powder, and the vanilla. beat until combined.
add the tapioca a bit at a time until you get the texture you like.
gradually add remaining sugar (more if you have to) until you get to the consistency and sweetness you like.

IMG_7275
annie loves them!!

clementine cupcakes...

04 March 2009

clementines are in season for about $4 for a big box and they seemed so perfect for some sweet sunshine on a dreary winter day...

IMG_7136
clementine cupcakes!

makes about 15 cupcakes

zest of 3 clementines
juice of 3 clementines
2 cups flour
2 teaspoons baking powder
1/2 teaspoon salt
1 stick butter (8 tablespoons)
2 eggs
2 teaspoons vanilla extract
1/2 cup milk
1 cup sugar

preheat the oven to 350. mix together flour, baking powder, zest and salt in a bowl. in a separate bowl, stir together milk, vanilla, and juice, mix. cream together the butter and sugar with an electric mixer, and add the eggs. slowly add in the dry mixture and then the milk mixture.
fill your liners about 3/4 of the way full and bake for 20-25 minutes, until toothpick inserted in center comes clean. let cool before frosting.


clementine icing!

  • 1 stick of butter, softened (8 tablespoons)
  • 4 cups confectioners' sugar
  • 1 teaspoon vanilla extract
  • 1/2 teaspoon clementine zest (about one clementine)
  • juice of about 2-4 cementines
  •  
  • beat butter until light and fluffy. slowly add the confectioners' sugar, vanilla & clementine peel. add juice...this is the only slightly tricky part: add the juice little by little until you reach the consistencey you like for your frosting. just add it little by little while it is mixing.  for a stiffer frosting, you can just add the juice of 2 clementines, but i was going for a more fluffy smooth frosting with a lot of flavor, so i added juice from about 3 1/2 clementines and it was just about right. 


  • IMG_7144
they were seriously yummy! some of the best cupcakes i have ever made i think!


Blogging tips