Fig Jam

14 July 2010

I am in love...with a sandwich. It's a very simple sandwich, but it rocks my world. Bagette + goat cheese + ham + fig jam = absolute perfection. I have not had an easy time finding said fig jam in the grocery store, so I was so excited to see fresh figs at the farm this weekend! I made a tiny batch to start and I cannot wait for fig season to be in full swing over the next few weeks so I can stock up.

IMG_0920

Figs are a little fruit that I have not had the good fortune to be able to experience much in my life and now that I have found them, I don't ever want to live without them. They are also just so beautiful. The color inside is so perfect.

5 cups chopped figs (about 2 dozen large figs) - stem and ends removed
1 1/4 package of low sugar pectin
3 cups sugar
1/4 cup lemon juice

You may want to peel your figs for astetics, but I think that is far more fuss than it's worth. Throw your figs into a large pot and mash up a bit with a potato masher. Add your pectin (mixed with 1/2 cup sugar) and bring them to a hard boil (one that cannot be stirred away). Once you are at a good boil, whisk in the rest of the sugar. You can add an extra cup of sugar if you want a sweeter jam - this recipe is really for a more subtle and less sweet blend that I can use in savory things. Bring back to a boil and let boil for one solid minute. Remove from heat. Check for jell with that handy spoon trick I told you about yesterday. Once you have the right consistency, fill up your jars and give them a good 10 minute process in the hot water bath.

Start making yourself some delicious sandwiches or serve with cheese and crackers at your next party!

Lavender-Peach Jam

13 July 2010

Lavender adds such a unique floral sweetness to any dish you put it in and it is just lovely to look at. There is a cute little lavender farm just outside of Portland where I was able to pick a big bunch of lovely purple buds fresh from the feild.

I decided that peaches would be the perfect partner for lavender because they are so sweet, clean, and mild. The flavors in the jam mix perfectly. I like the strong floral umpf that the flowers offer, so I was a little heavy handed with it - but if you are a little shy on florals you can just use tea without adding the buds.

IMG_0898

The first step is to make a lavender "tea". Mix 1/2 cup of hot water with 2 tablespoons of lavender buds. Mix over high heat until the mix comes to a boil. Take off the heat and leave to cool completely (30+ minutes). Then drain out the buds to collect a lovely fragrant purple tea.

IMG_0908

Next, start work on your peaches. You will want to remove the skins because they can be bitter and chewy. The easiest way to peel peaches is to put them into boiling water for 30 seconds, then drop them into an ice water bath. The skin will rub right off. Once the skin is off, you can dice your peaches and put them into a large pot. Mash your peaches down a bit with a potato masher and turn the heat to medium-high. Add your lemon juice, lavender tea, and buds.

The amount of sugar that you need will depend on which type of pectin you use, so be sure to check that little handy guide that comes inside your pectin box. This recipe is based on using a low sugar pectin formula. The low sugar pectin is always my go-to becuase it produces a solid jell with a sweet flavor without being completely overwhelmed with sugar. It also is availabe just as readily as the traditional high sugar kind. If you are using a regular pectin, you will probably need about 8 cups of sugar.

Take 1/4 cup sugar and stir it into the package of powdered pectin. This will help the pectin to not clump up. Add to the peach mixture and stir well. Bring to a rolling boil - one that you are not able to stir away. Once you are at a good soild boil, add the rest of the sugar and stir. Bring back up to that strong boil and let boil for exactly one minute. Remove from the heat.

To check your jam for consistency, I like to keep a metal spoon in icewater ready. Scoop a bit of the jam and let it cool completely (the freezer can help with that). Once the jam cools, you can make sure it is the jelly consistency that you like. If it is too runny, you can add more pectin and boil for one more minute.

Once you are at the right consistency, you can start filling your jars! Process for 10 minutes in a hot water bath. You can also make this a freezer jam or just make a small batch to enjoy that week (don't worry, it won't last long!) if you don't want to fuss with the canning process.

IMG_0953

This jam would make an excellent sweet marinade on meat or just a perfect element for your toast!

Jam Week!

11 July 2010

One of my very favorite childhood memories is of making jam. When I was a little girl, my mother and grandmother would take me to pick strawberries in the feilds of Styer Orchards and then we would make huge batches of strawberry jam. That vivid memory of perfect summer days, the sweet smell of cooking berries, and 3 generations together in the kitchen is really what motivated me to learn to make jams on my own. There is something really wonderful and special about connecting to the past and traditions in the form of food.

The process of canning may seem a little intimadating, but it has come a long way since my gradmother's kitchen and it just takes a little practice to master.

The best online resource for any begining jam maker is definitely pickyourown.org...they offer a comprensive step by step guide (with photo of each step) for most basic recipes. They also sell supplies.

Speaking of supplies, in order to start canning, you will need a few basic items. I suggest you start with the essensials at first and then you can add more specialized items to your arsenal from there...

The first thing you need is a canning pot (or "canner") - you can find them online or at most major stores (I've seen them at Fred Meyer & Walmart) for about $25, but I see them constantly at thrift stores and estate sales for a couple of dollars - so it is probably worth keeping an eye out. The canning pots should come with with a wire rack that fits into the bottom to keep your jars from banging together and keep direct heat off the bottom of the jar.

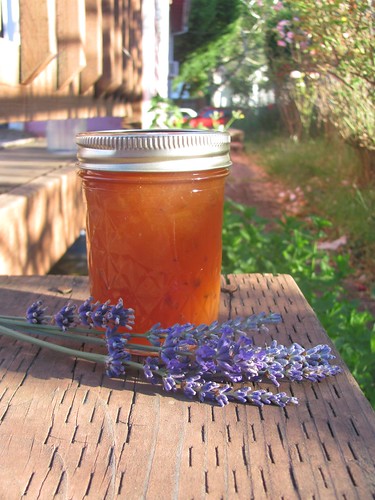
You also need to select the size and style of jars you want to use. When it comes to jam, I prefer half-pint and 4oz jars. The jam will last for 1 year in the cabinet, but once your jam is opened it has a more limited life in the fridge, so I just think the smaller jars are more practical. I also like that I can make more jars to share with friends. Larger full pint and quart jars are perfect for sauces and veggie canning. You can reuse your jars and the rings year after year as long as you are careful to inspect them for chips or fractures before using. The top lid piece of the jars is the only part that will need to be replaced with each use (it has a rubber gum that assists in the sealing process).

Other tools you need to get started: a nice big pot to make your jam, ladle, and tongs or a jar lifter. Jar lifter tool is really a wonderful thing to own if you are doing any kind of canning. You can use tongs to get the jars out, but the jar lifter will save you a lot of aggrivation and will be well worth the 5 bucks.

Once you get all the basics down, you are ready to start making jam!

This summer, I am working on some non-traditional jams. I will be posting a new recipe each day this week! Welcome to Jam Week!
 
Blogging tips